Scan Options
Cloudhouse Guardian (Guardian) offers you the opportunity to customize the scans of your node groups in the Monitored tab (
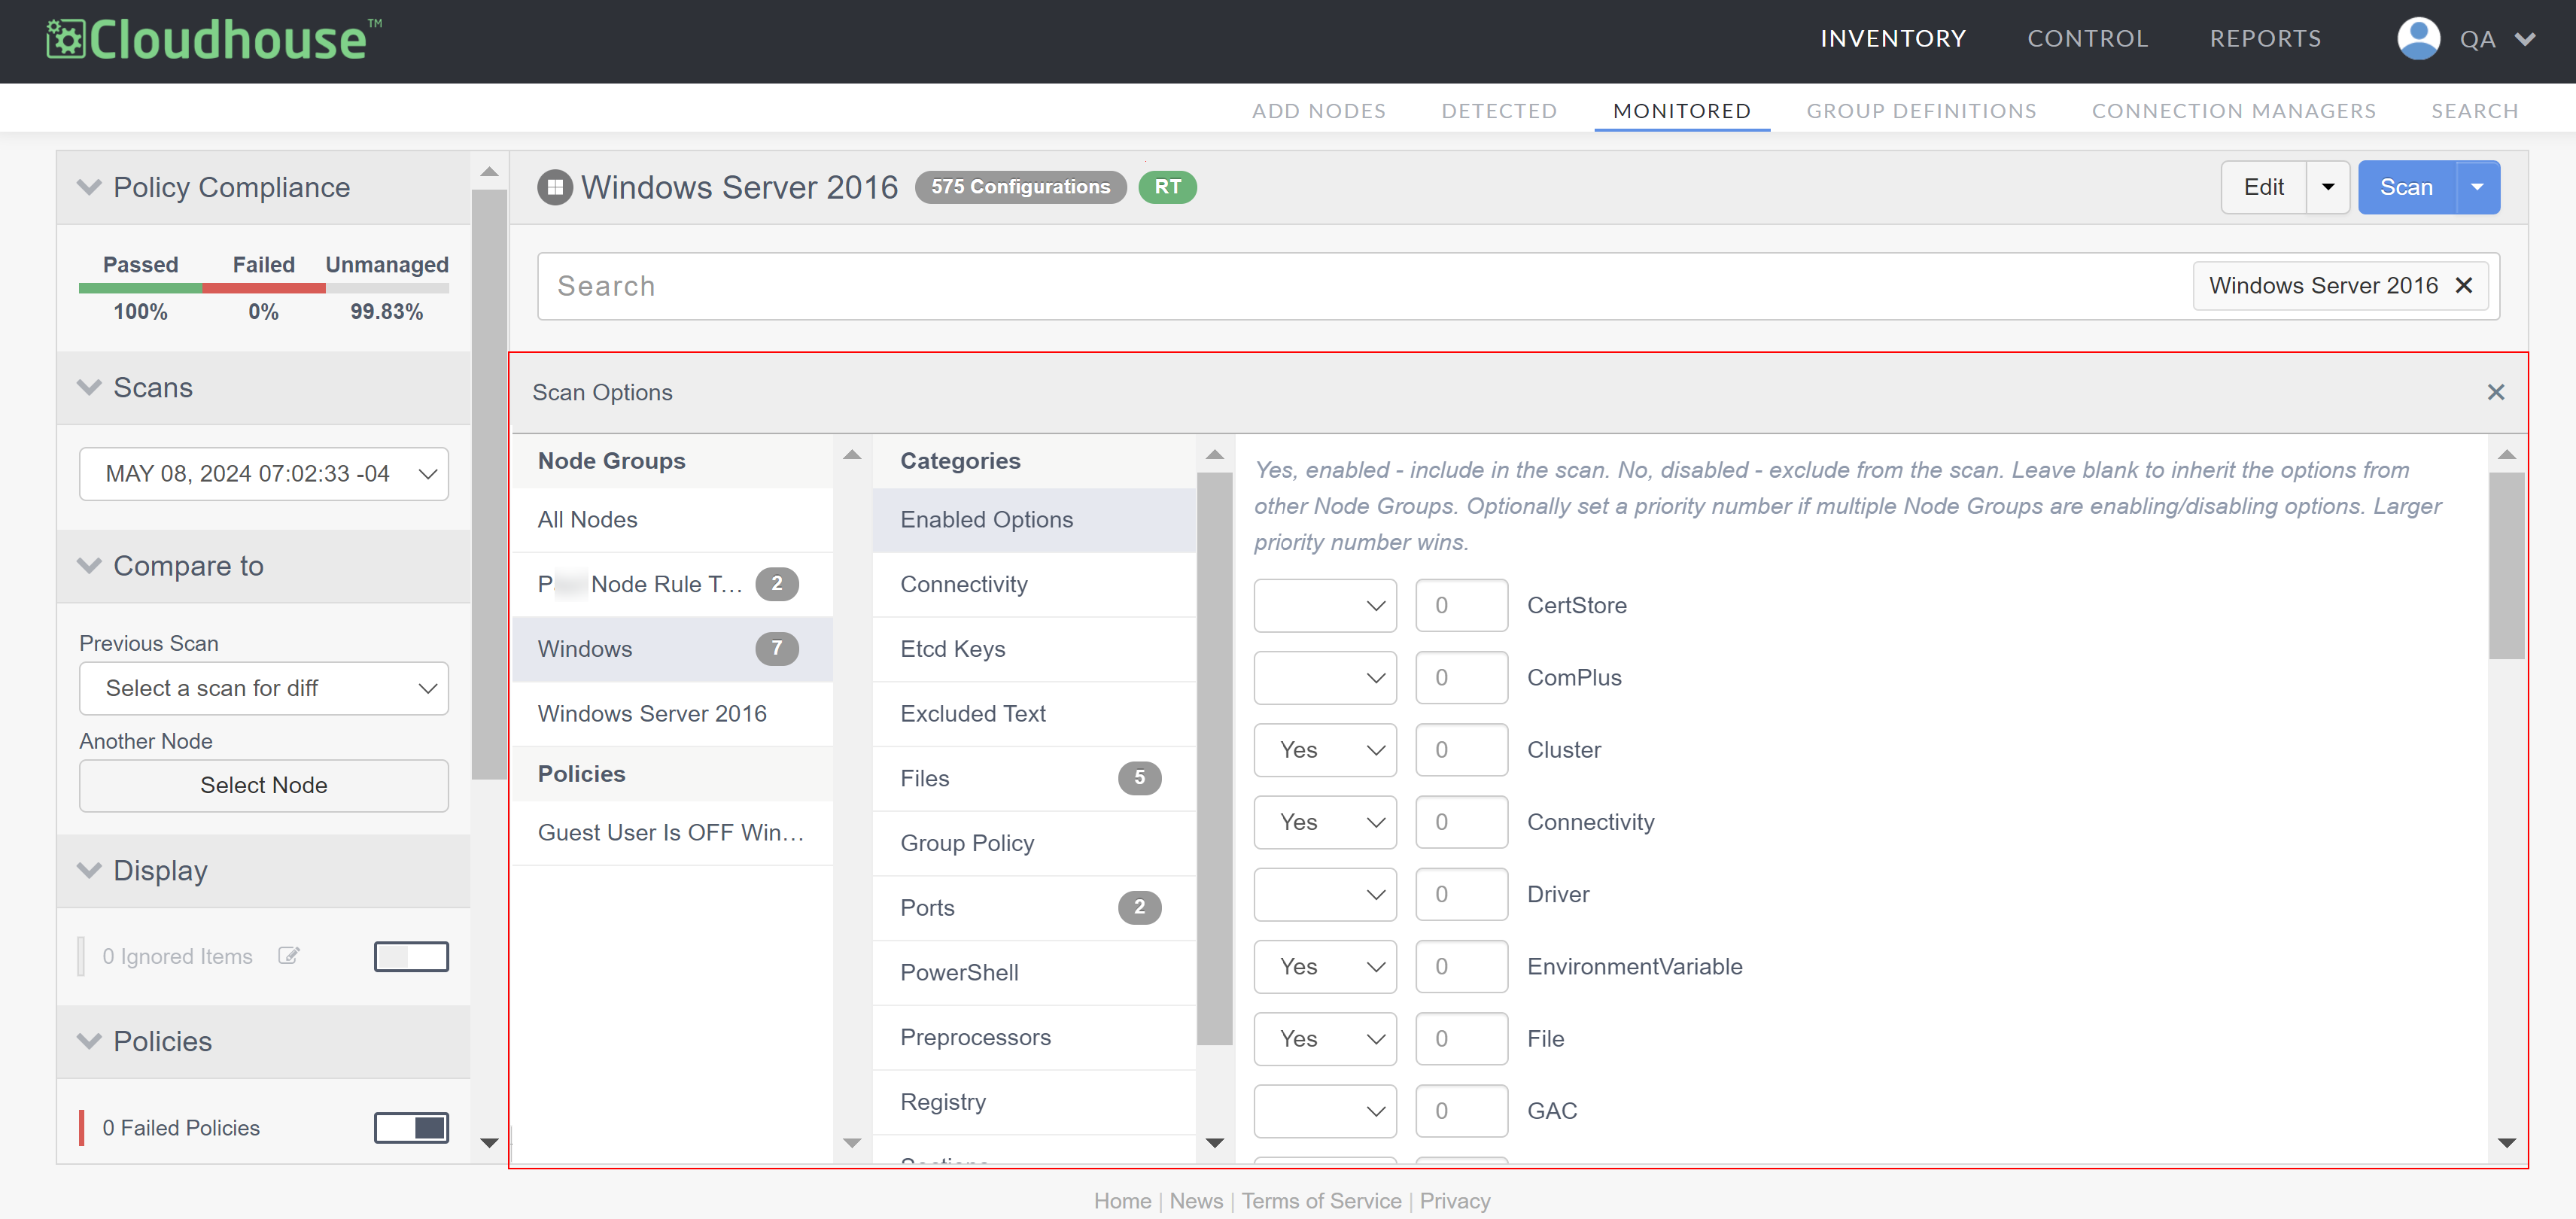
When accessing a node's scan options, you can view what node groups and policies are assigned to it. Including what scan categories are available for customization. Scan categories are particular areas of a node group's settings that can be specified to give extra visibility into items of particular interest when a node scan is run. The scan options displayed vary according to each node group internal configurations. For more information on the different scan categories available in Guardian, see Categories.
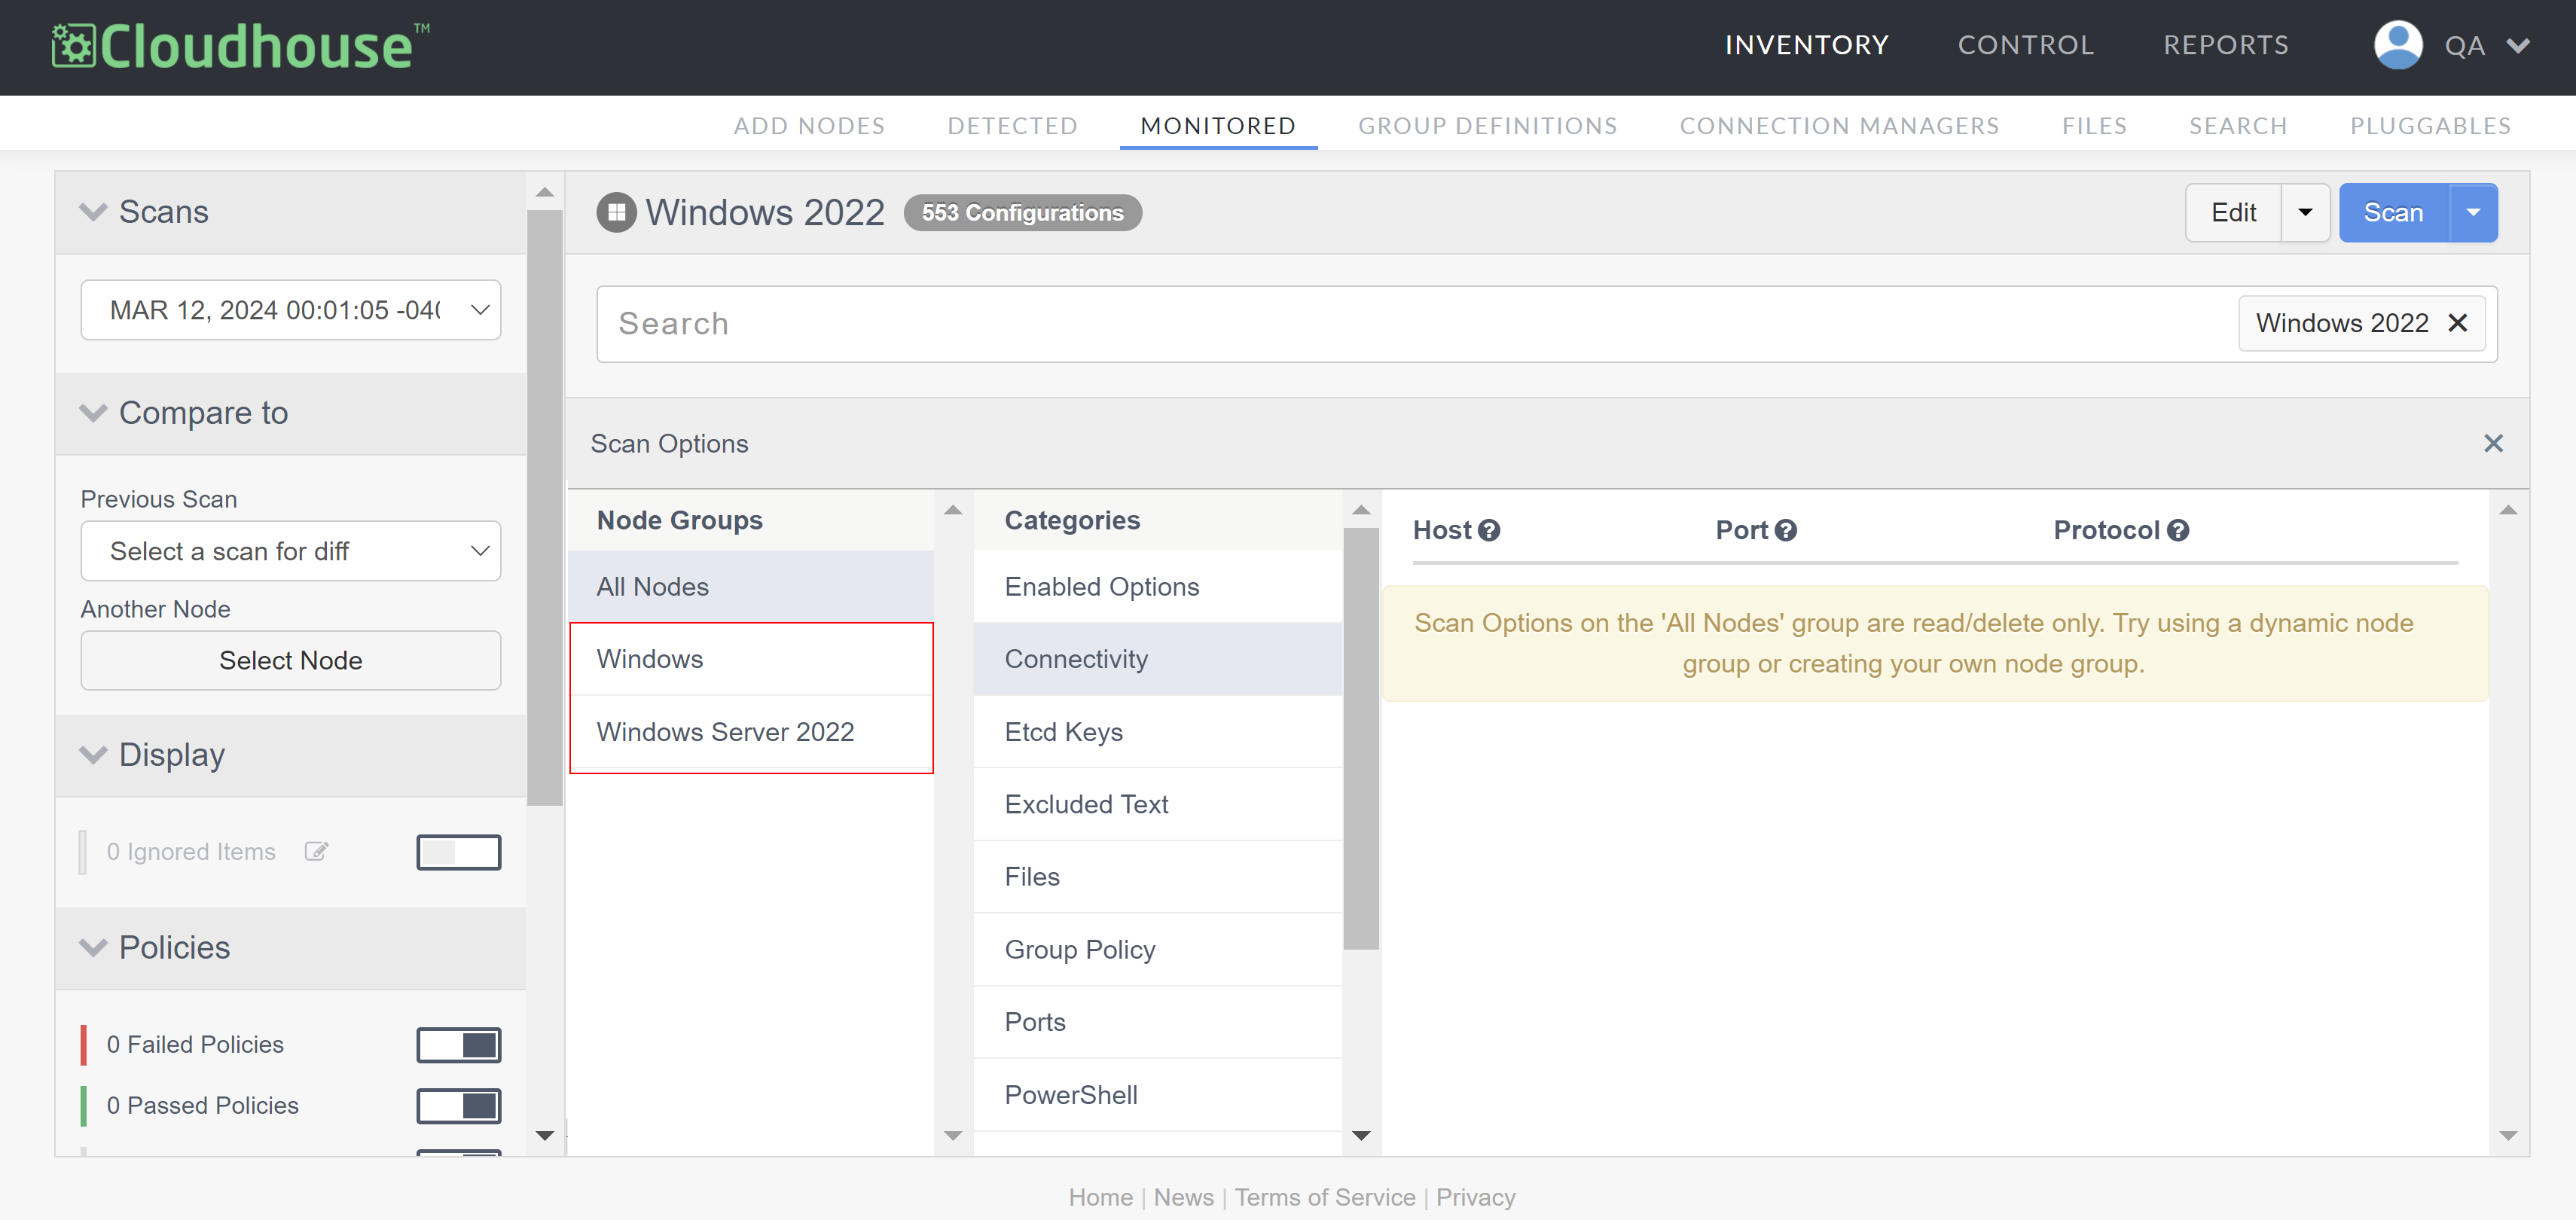
Node Groups
The Node Groups area displays each of the Node Groups that the selected node belongs to. By default, the 'All Nodes' node group is displayed. However, the scan options for this group is read-only. Select another node group from the list to edit the scan options that are present. For more information on how to edit each of the categories displayed, see Edit Scan Options.
Policies
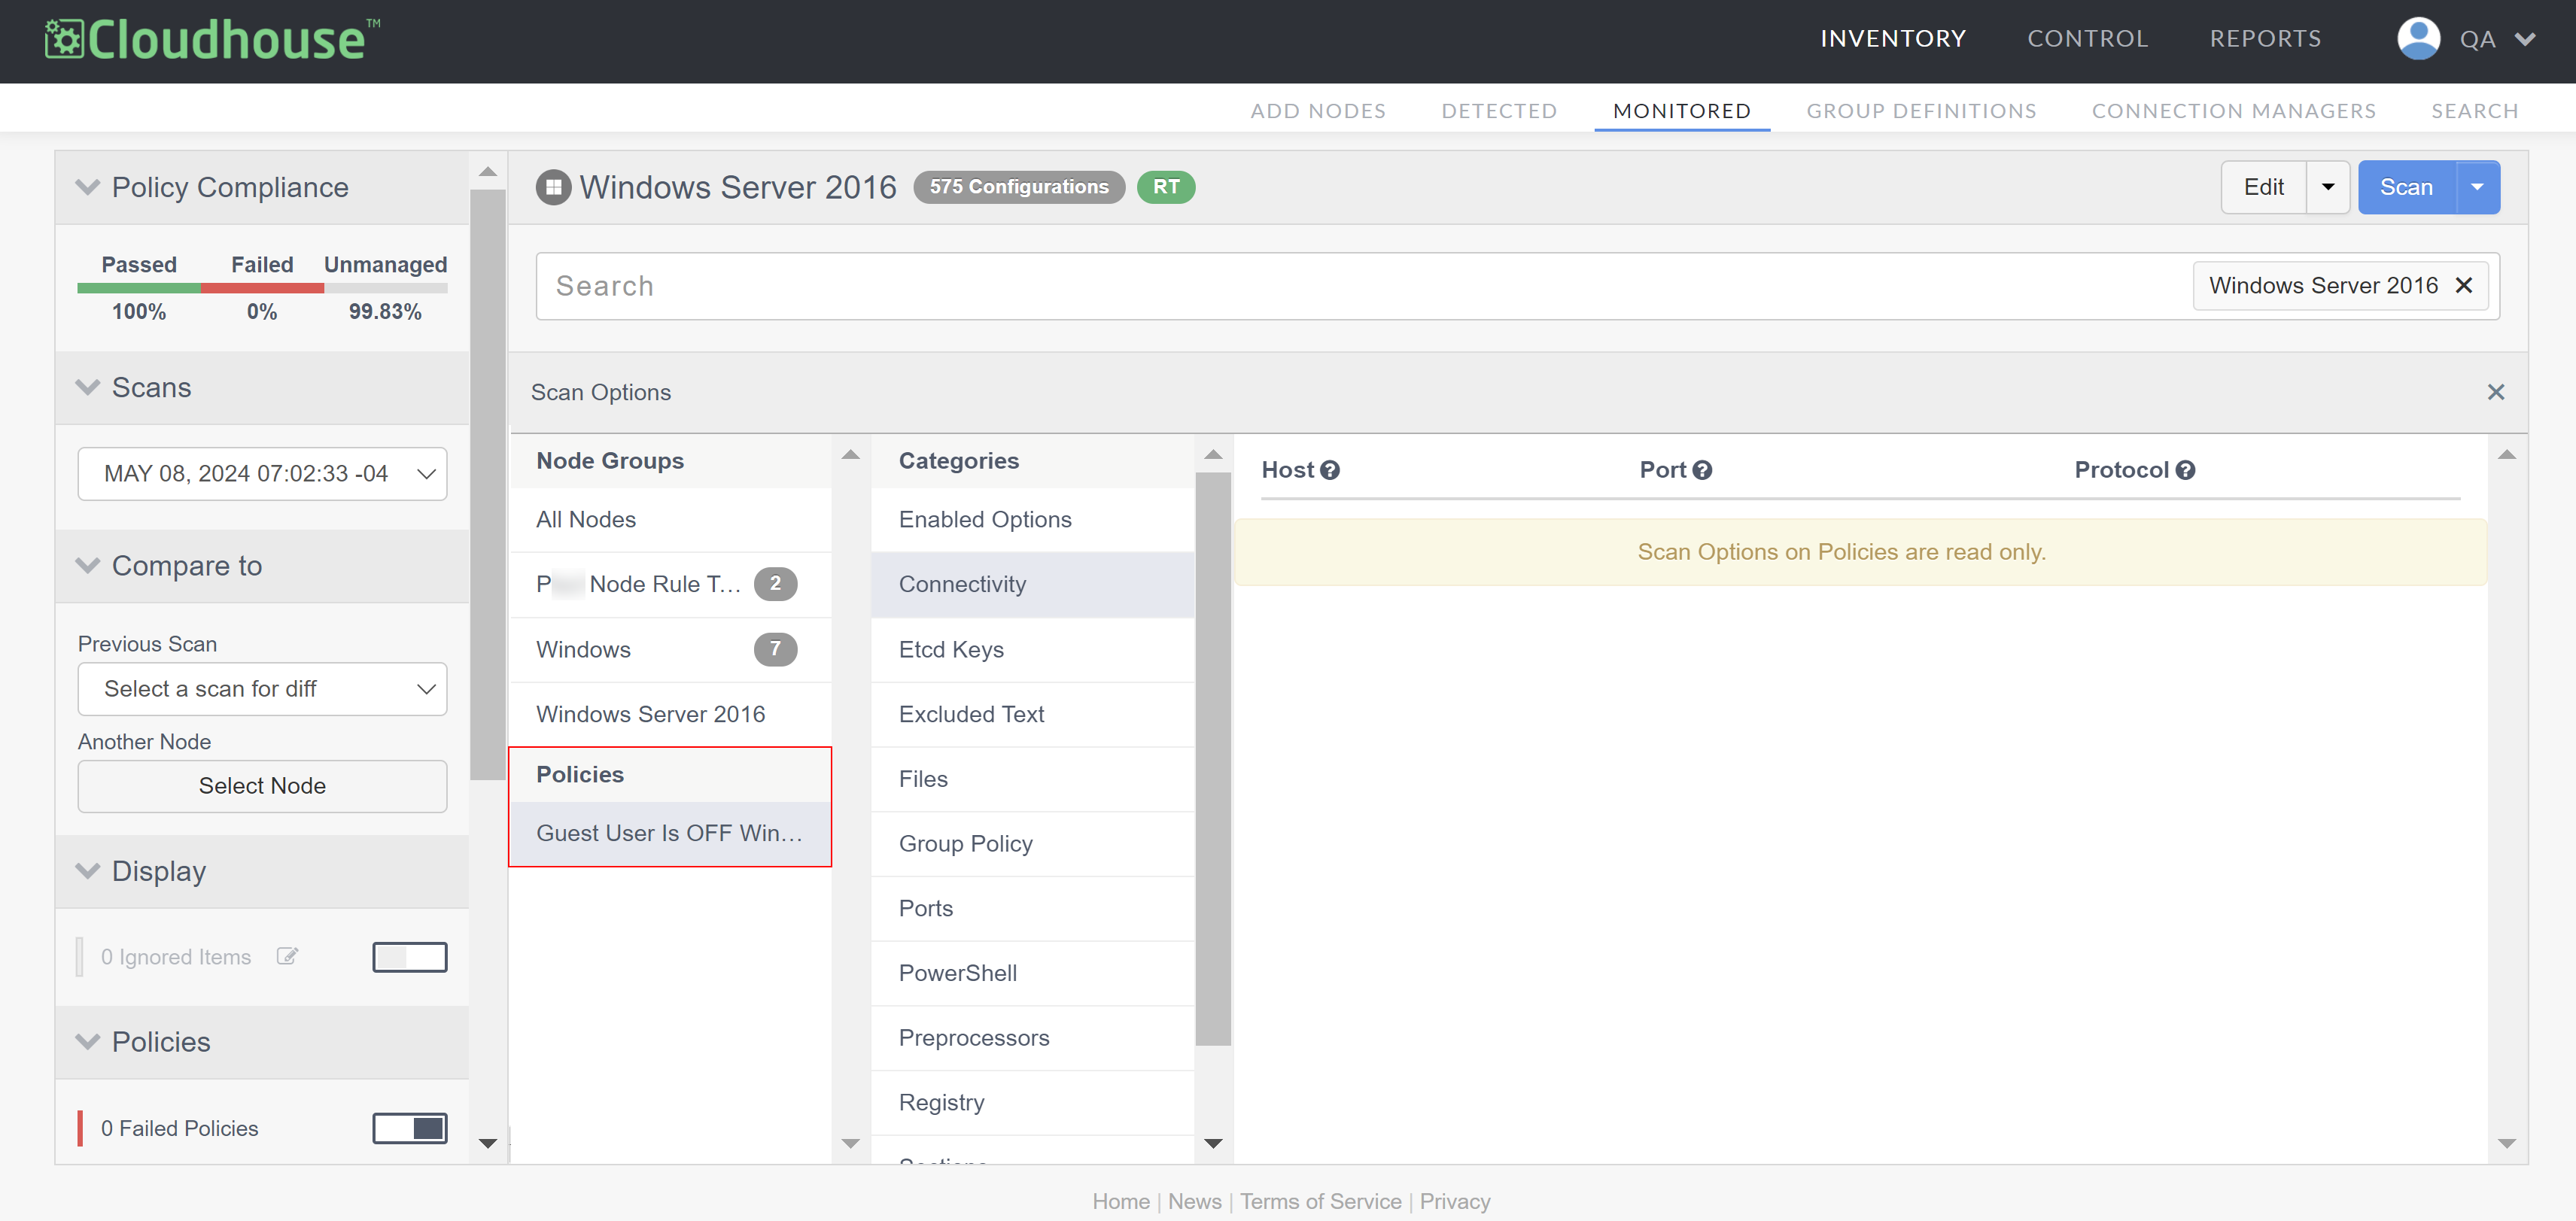
In Guardian, the Policy tab (Control > Policies) contains a set of configurations you expect nodes to meet by running a series of checks. Policies can be applied to node groups to assess their compliance with the configurations the policy defines, and the results can be viewed in a Policy Report. In the Scan Options page, if a node group has policies applied, the Policies section displays the corresponding policies for you to view. Scan options on policies are read-only and cannot be edited from this page.
Tip: Policy scan options are automatically generated when the policy's checks are created. Meaning, Guardian automatically creates the scan options required to ensure that the policy checks can be evaluated. For example, if you create a check for a file, Guardian will add a scan option for the file. To edit a policy's scan options, edit the checks.
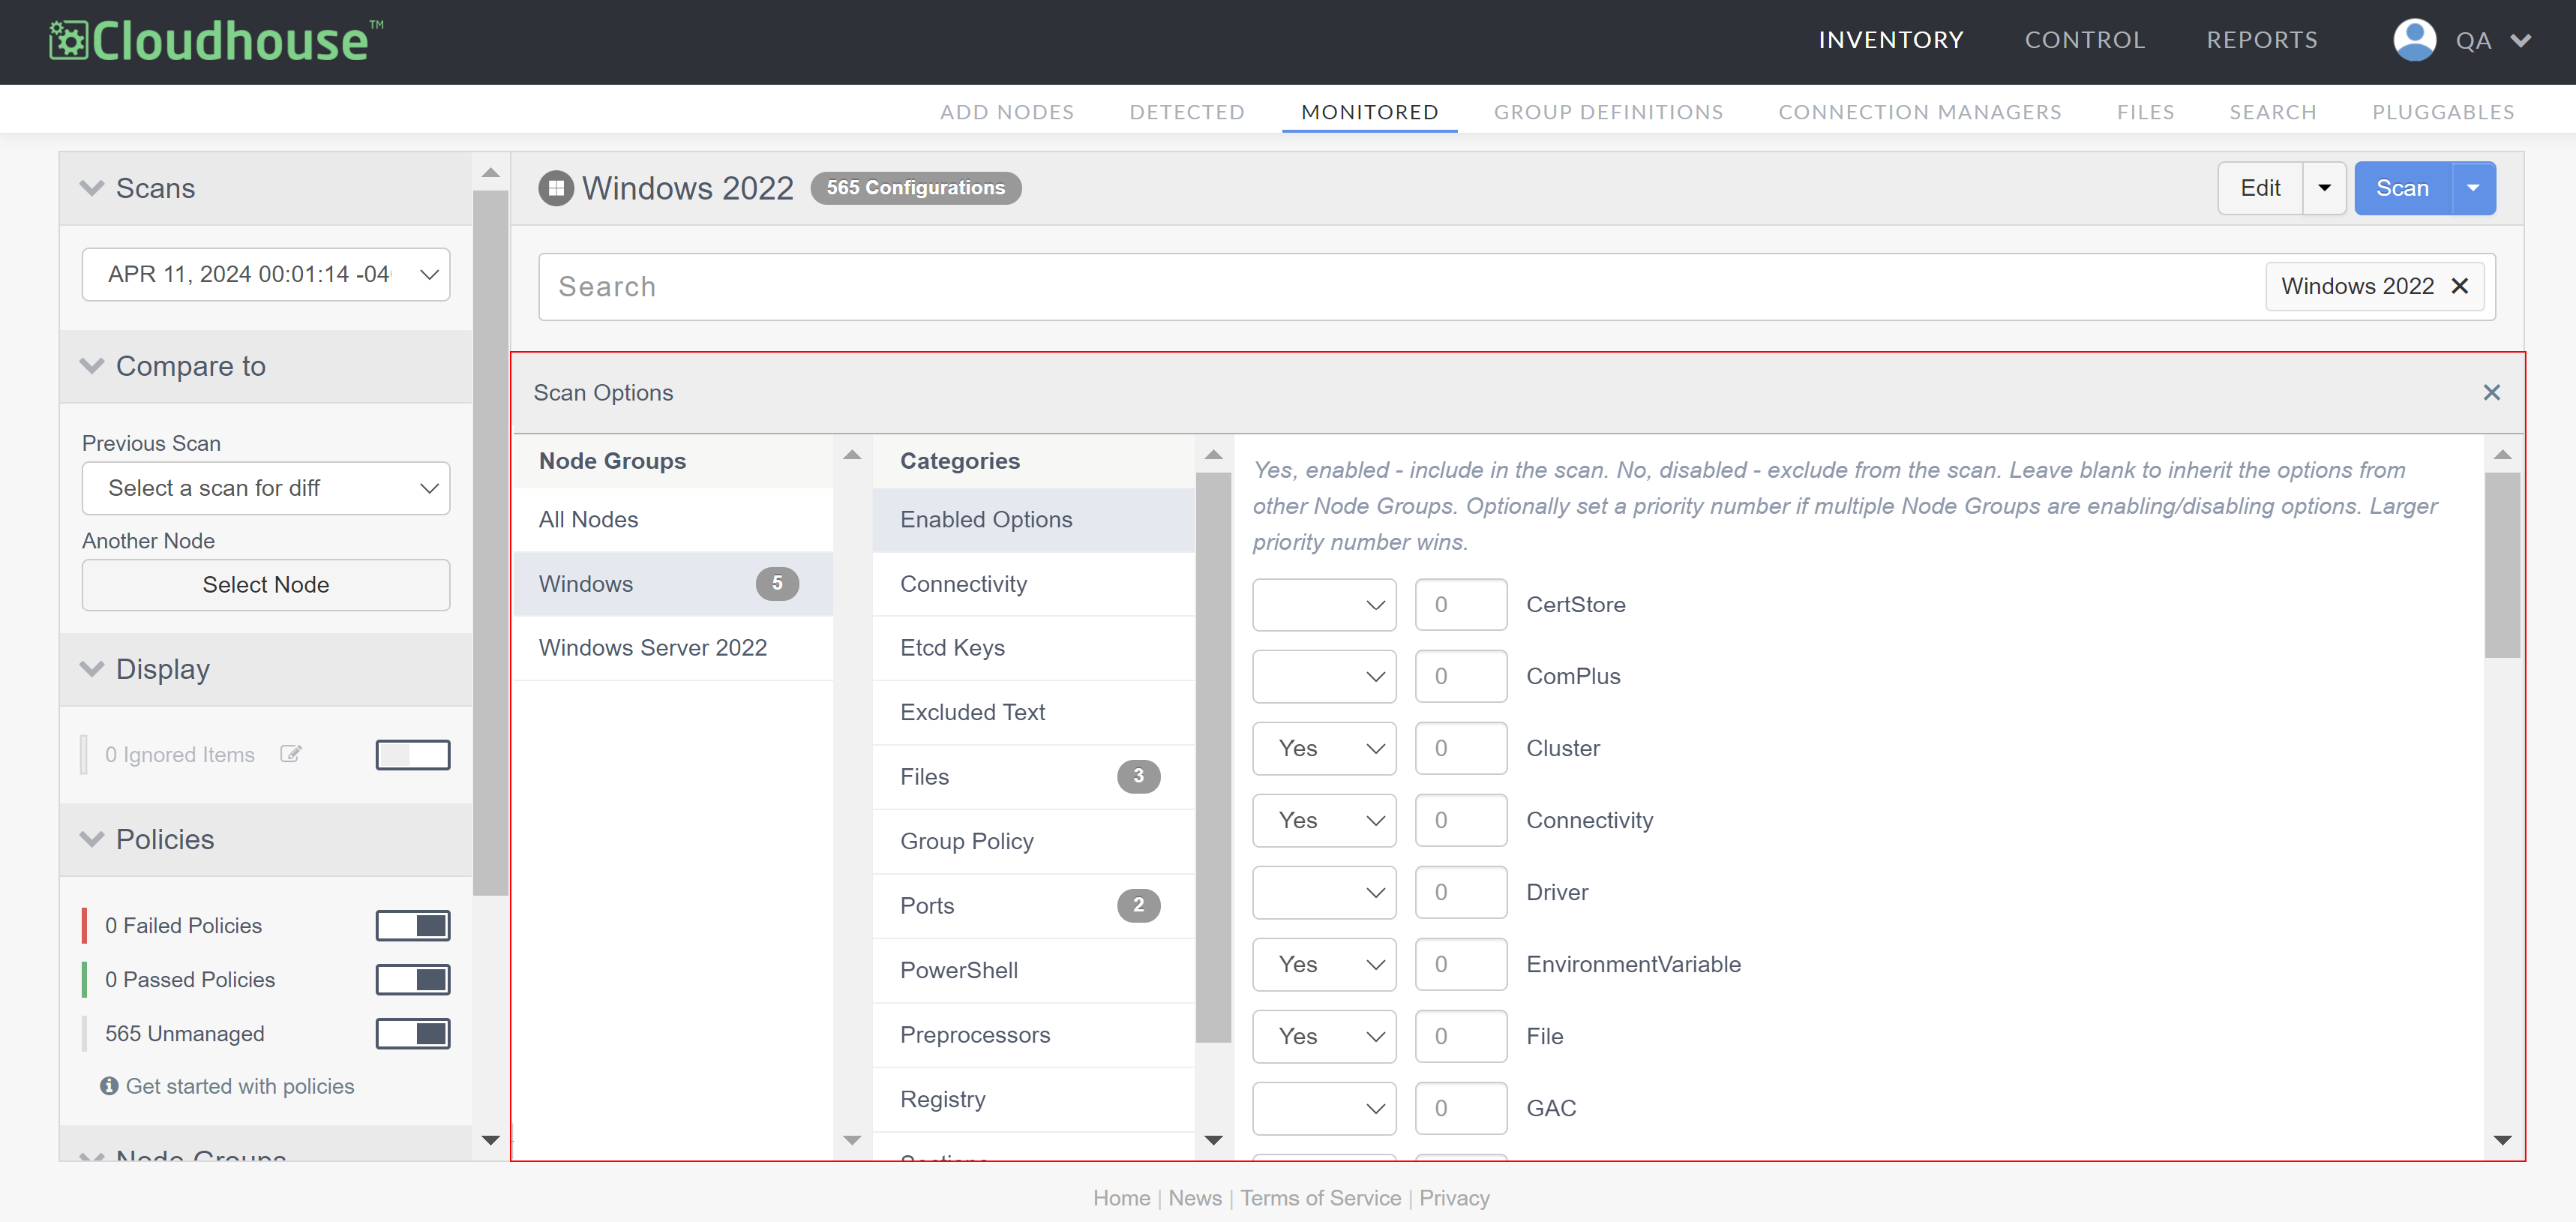
Categories
The Categories section displays each of the scan categories that have scan options applied. Here, you can view, add, or edit the scan categories. For more information on how to access this page, see Edit Scan Options. If you want to edit additional scan categories that aren't displayed here, you can edit the node group's settings directly. For more information, see Edit Node Group.
Tip: If you see a number next to a category or node group name, that is the number of existing scan options within that category or node group.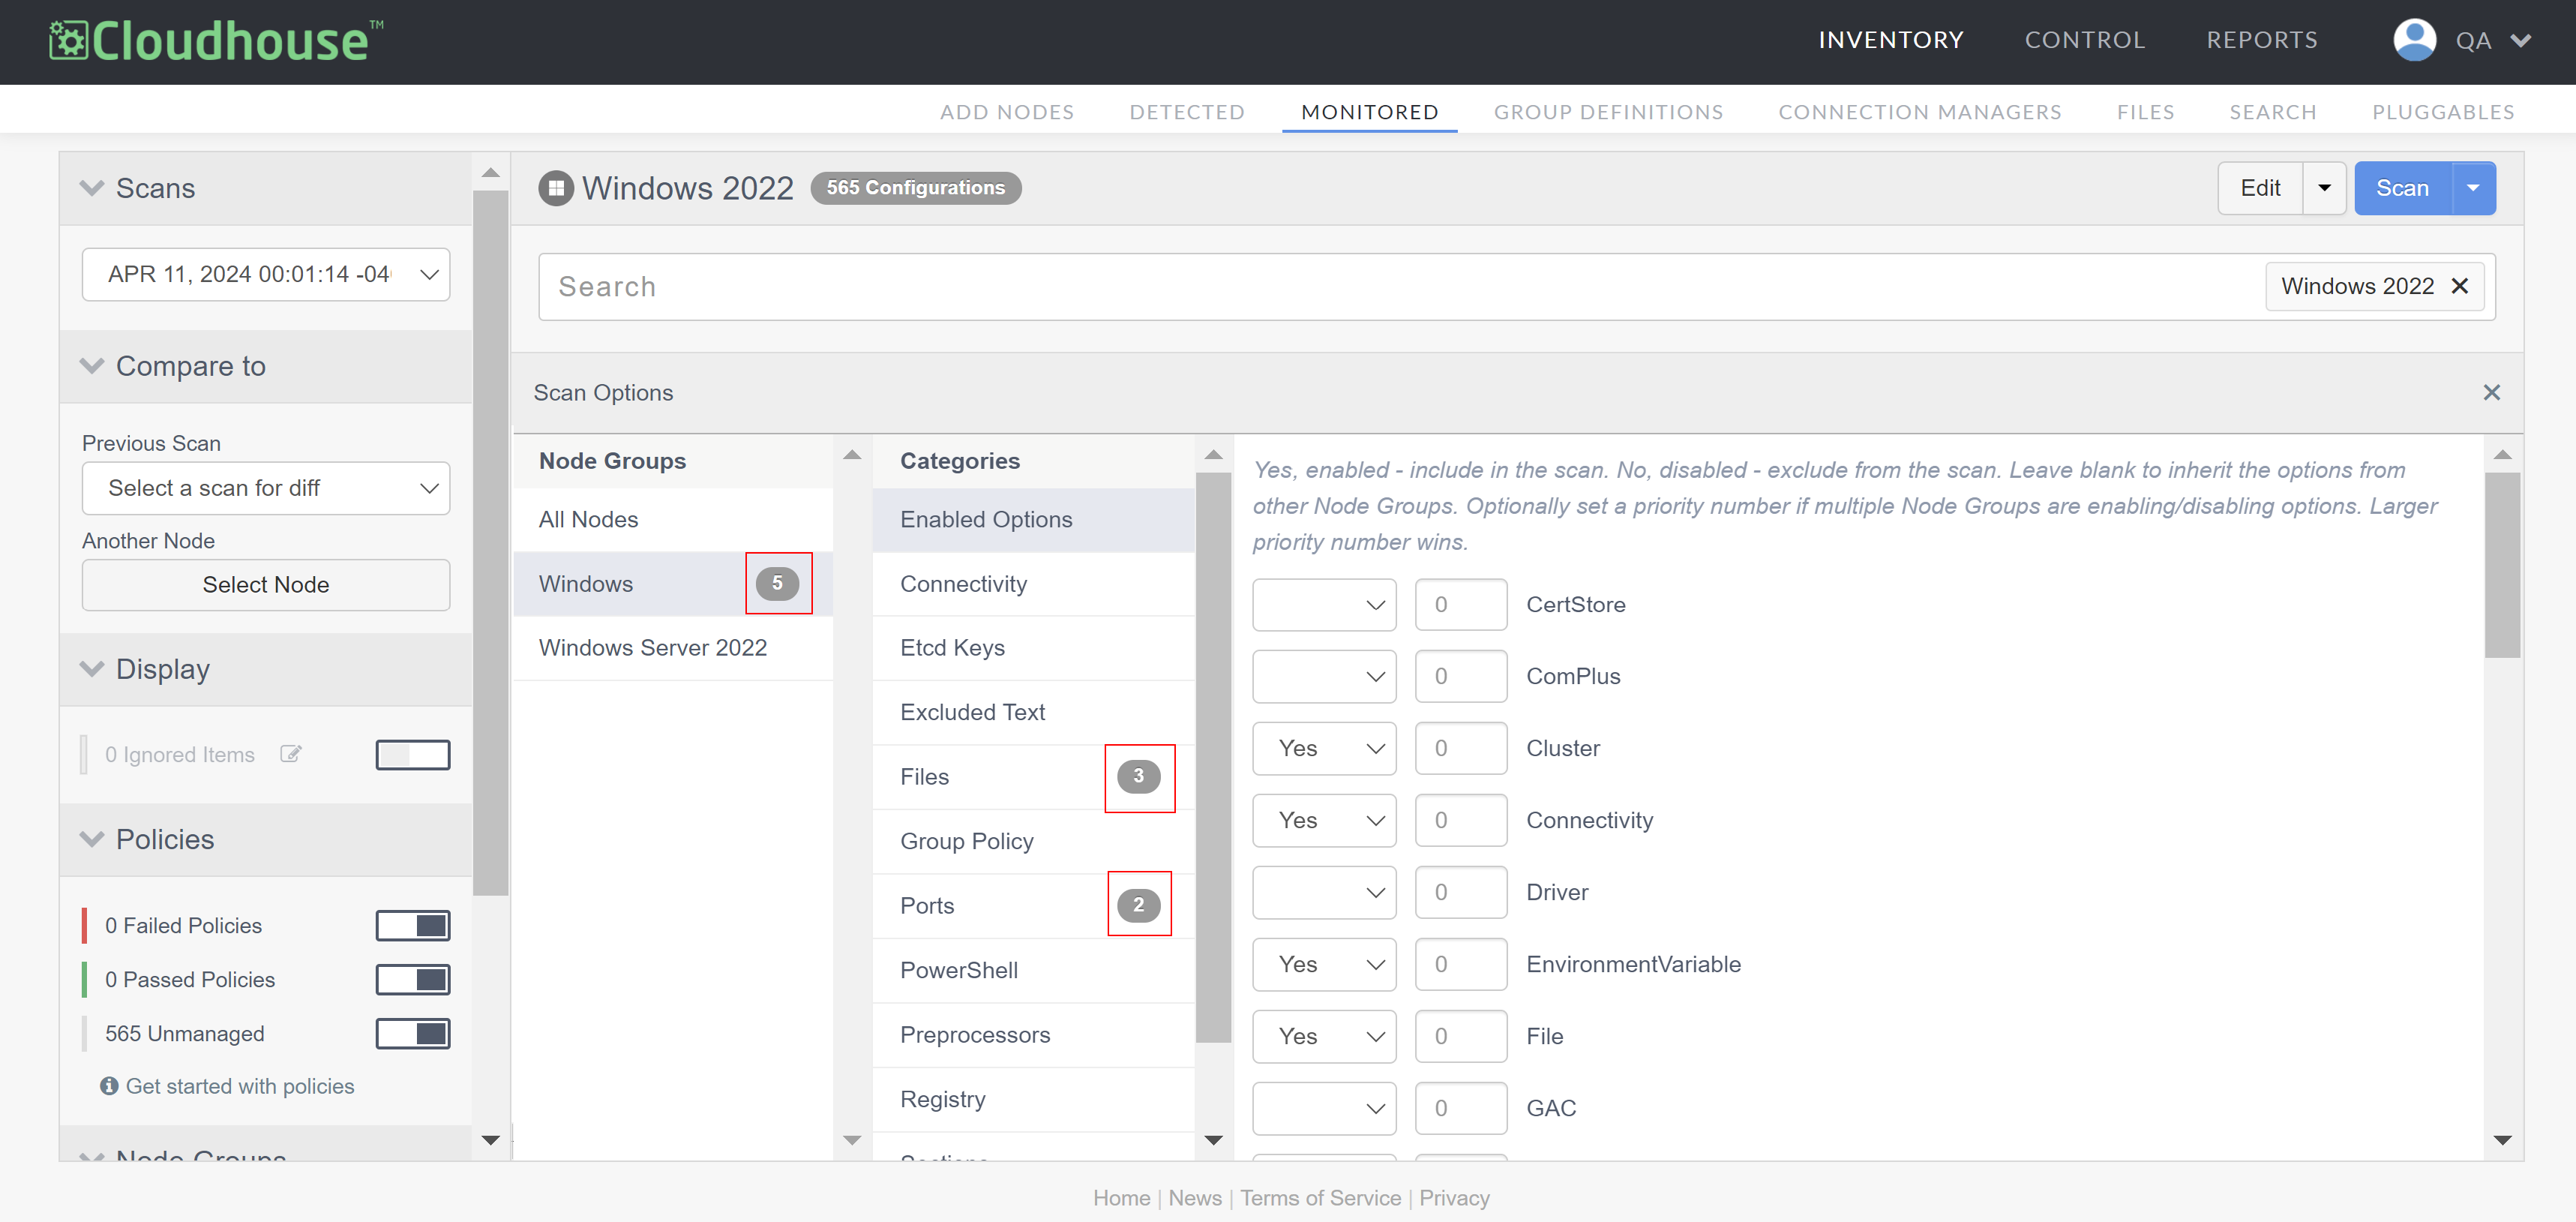
| Category | Description |
|---|---|
| Enabled Options (Only displayed for top-level Windows/Linux groups) |
The sections of your node you want to be scanned. Select 'Yes' or 'No' from each drop-down list item to set your scan preferences. Leave a section blank to inherit the options from the node group's settings. Optionally, you can select a priority number, next to the 'Yes' or 'No' drop-down list, from 1 - 1000, '1' being the highest priority. By default, if a scan option does not have a priority value set, then it defaults to the value '1000'. For more information on how you can set a custom priority for a file scan option, see Custom Order of Precedence. Note: There are several sections of your node group you can enable to be scanned, including Resultant Set of Policy (RSoP). For more information, see Enabled Options - RSoP (Windows only). Once complete, click the Save button to add the scan sections to your node group's scan options. Repeat as required. |
| Connectivity |
Any connectivity checks that you want to be done against the host and port, via TCP or UDP protocol, to determine whether a node is able to establish a connection to a specific system (or service) via the specified port. The following options are displayed:
Once complete, click the Check button ( |
|
Etcd Keys (Only applies to CoreOS nodes running the etcd service.) |
The key-value pairs to be scanned for etcd files. You can specify multiple keys, or patterns representing groups of keys, one per line. The following options are displayed:
Note: By default, the scan collects text file contents as an MD5 checksum. If the Contents checkbox is selected, the scan will read the raw contents of the key and enable change detection to be executed on the key's contents. The contents of binary files and files exceeding 100KB are not retrieved during a scan, regardless of whether the Contents checkbox is selected. Once complete, click the Check button ( |
| Excluded Text |
Any text that you want to be excluded during configuration differencing. For more information, see Configuration Differencing. Enter text that you want to be excluded in the Text to Exclude field, using regular expression (RegEx). For example, to exclude any string that starts with 'version', use Once complete, click the Check button ( |
| Files |
The directories to be scanned for files. Multiple files, or patterns representing groups of files, can be specified one per line. The following options are displayed:
Once complete, click the Check button ( Tip: You can also add files to your scan options directly from the node scan results page by right-clicking the file you want to add, selecting Add Scan Option and the corresponding node group. This allows you to conveniently add files that will have their entire contents scanned without needing to type the full file path. |
| NMAP (Linux only) |
Additional arguments to be used during Network Mapper (NMAP) scanning. Enter an argument in the NMAP field to initiate an NMAP scan via the Linux Connection Manager (using the provided settings). Ports for this scan can be designated in the following ways:
Once complete, click the Check button ( |
| Group Policy (Windows only) |
Group Policy Objects (GPO) to be scanned by your Windows Connection Manager. Enter the name of the GPO as it appears in the Windows Group Policy Management Console. Once complete, click the Check button ( |
| Ports |
The ports to be scanned. By default, active local TCP and UDP ports 1 - 1024 are scanned. Here, you can specify a range of ports to be scanned. The following options are displayed:
Once complete, click the Check button ( |
| PowerShell (Windows only) |
PowerShell queries to be run and scanned by your Windows Connection Manager. The following options are displayed: Note: This functionality requires Guardian Agent v3.1.1.
Once complete, click the Check button ( |
| Preprocessors (Linux only) | Option to add processes to the output of a command before it is added to a node scan. For example, a process to remove sensitive data. The following options are displayed:
Once complete, click the Check button ( |
| Custom Scripts (Linux only) |
Custom scripts for Linux nodes to be run and scanned. Custom scripts enable you to run commands outside of those provided by a default node scan. The following options are displayed:
Returned scripts are displayed as flat files under the scripts section of the node scan results page. For more information, see Node Scan Results. This allows you to return data that may not have a strictly defined structure. Once complete, click the Check button ( |
| Registry (Windows only) |
Registry keys to be scanned by your Windows Connection Manager. Enter the absolute path to a key-value name or parent key path in the Registry Key field. Abbreviations such as 'HKLM' are supported. For example: Note: For scanning multiple registry sub keys, Guardian supports glob syntax to make it easier to work with multiple files that share the same or similar file names. For sub keys, using ' Once complete, click the Check button ( |
| Sections (Windows and Linux only) |
Additional sections that you want to be scanned. Enter a value in the Additional Scan Sections field. For example, 'RSoP' or 'docker', for Windows and Linux nodes respectively. Note: For Windows nodes only, you can enter 'IIS' to be scanned by your Windows Connection Manager. Once the scan options are saved and applied, the next time the nodes are scanned, the IIS setting is displayed in the node scan results page. Once complete, click the Check button ( |
| Schemas (Database only) |
Option to scan data schemas within a database. Enter the name of the schema in the Schemas field. For example, Once complete, click the Check button ( |
| Web |
Any Web checks that you want to be done against an endpoint URL to determine whether a node is able to connect to the Web endpoint and, optionally, retrieve the contents of the response body. The following options are displayed:
Note: By default, the scan collects text file contents as an MD5 checksum. If the Contents checkbox is selected, the scan will read the raw contents of the file and enable change detection to be executed on the file contents. The contents of binary files and files exceeding 100KB are not retrieved during a scan, regardless of whether the Contents checkbox is selected. Once complete, click the Check button ( |
| SQL (Databases only) |
SQL queries to be run and results scanned to detect changes to database table schemas, triggers, stored procedures, or indexes, for example. To detect column or attribute changes you can select on your databases schema table, for example, you would set the schema for the first Microsoft SQL Server database and select the sales column data: The following options are displayed:
Once complete, click the Check button ( |
Edit Scan Options
To edit the scan options for a node, complete the following steps:
Note: Additionally, you can access the full set of scan options from within the node group's settings. For more information, see Edit Node Group.
-
In the Guardian web application, navigate to the Monitored tab. By default, all currently monitored nodes are displayed within the 'All Nodes' node group.
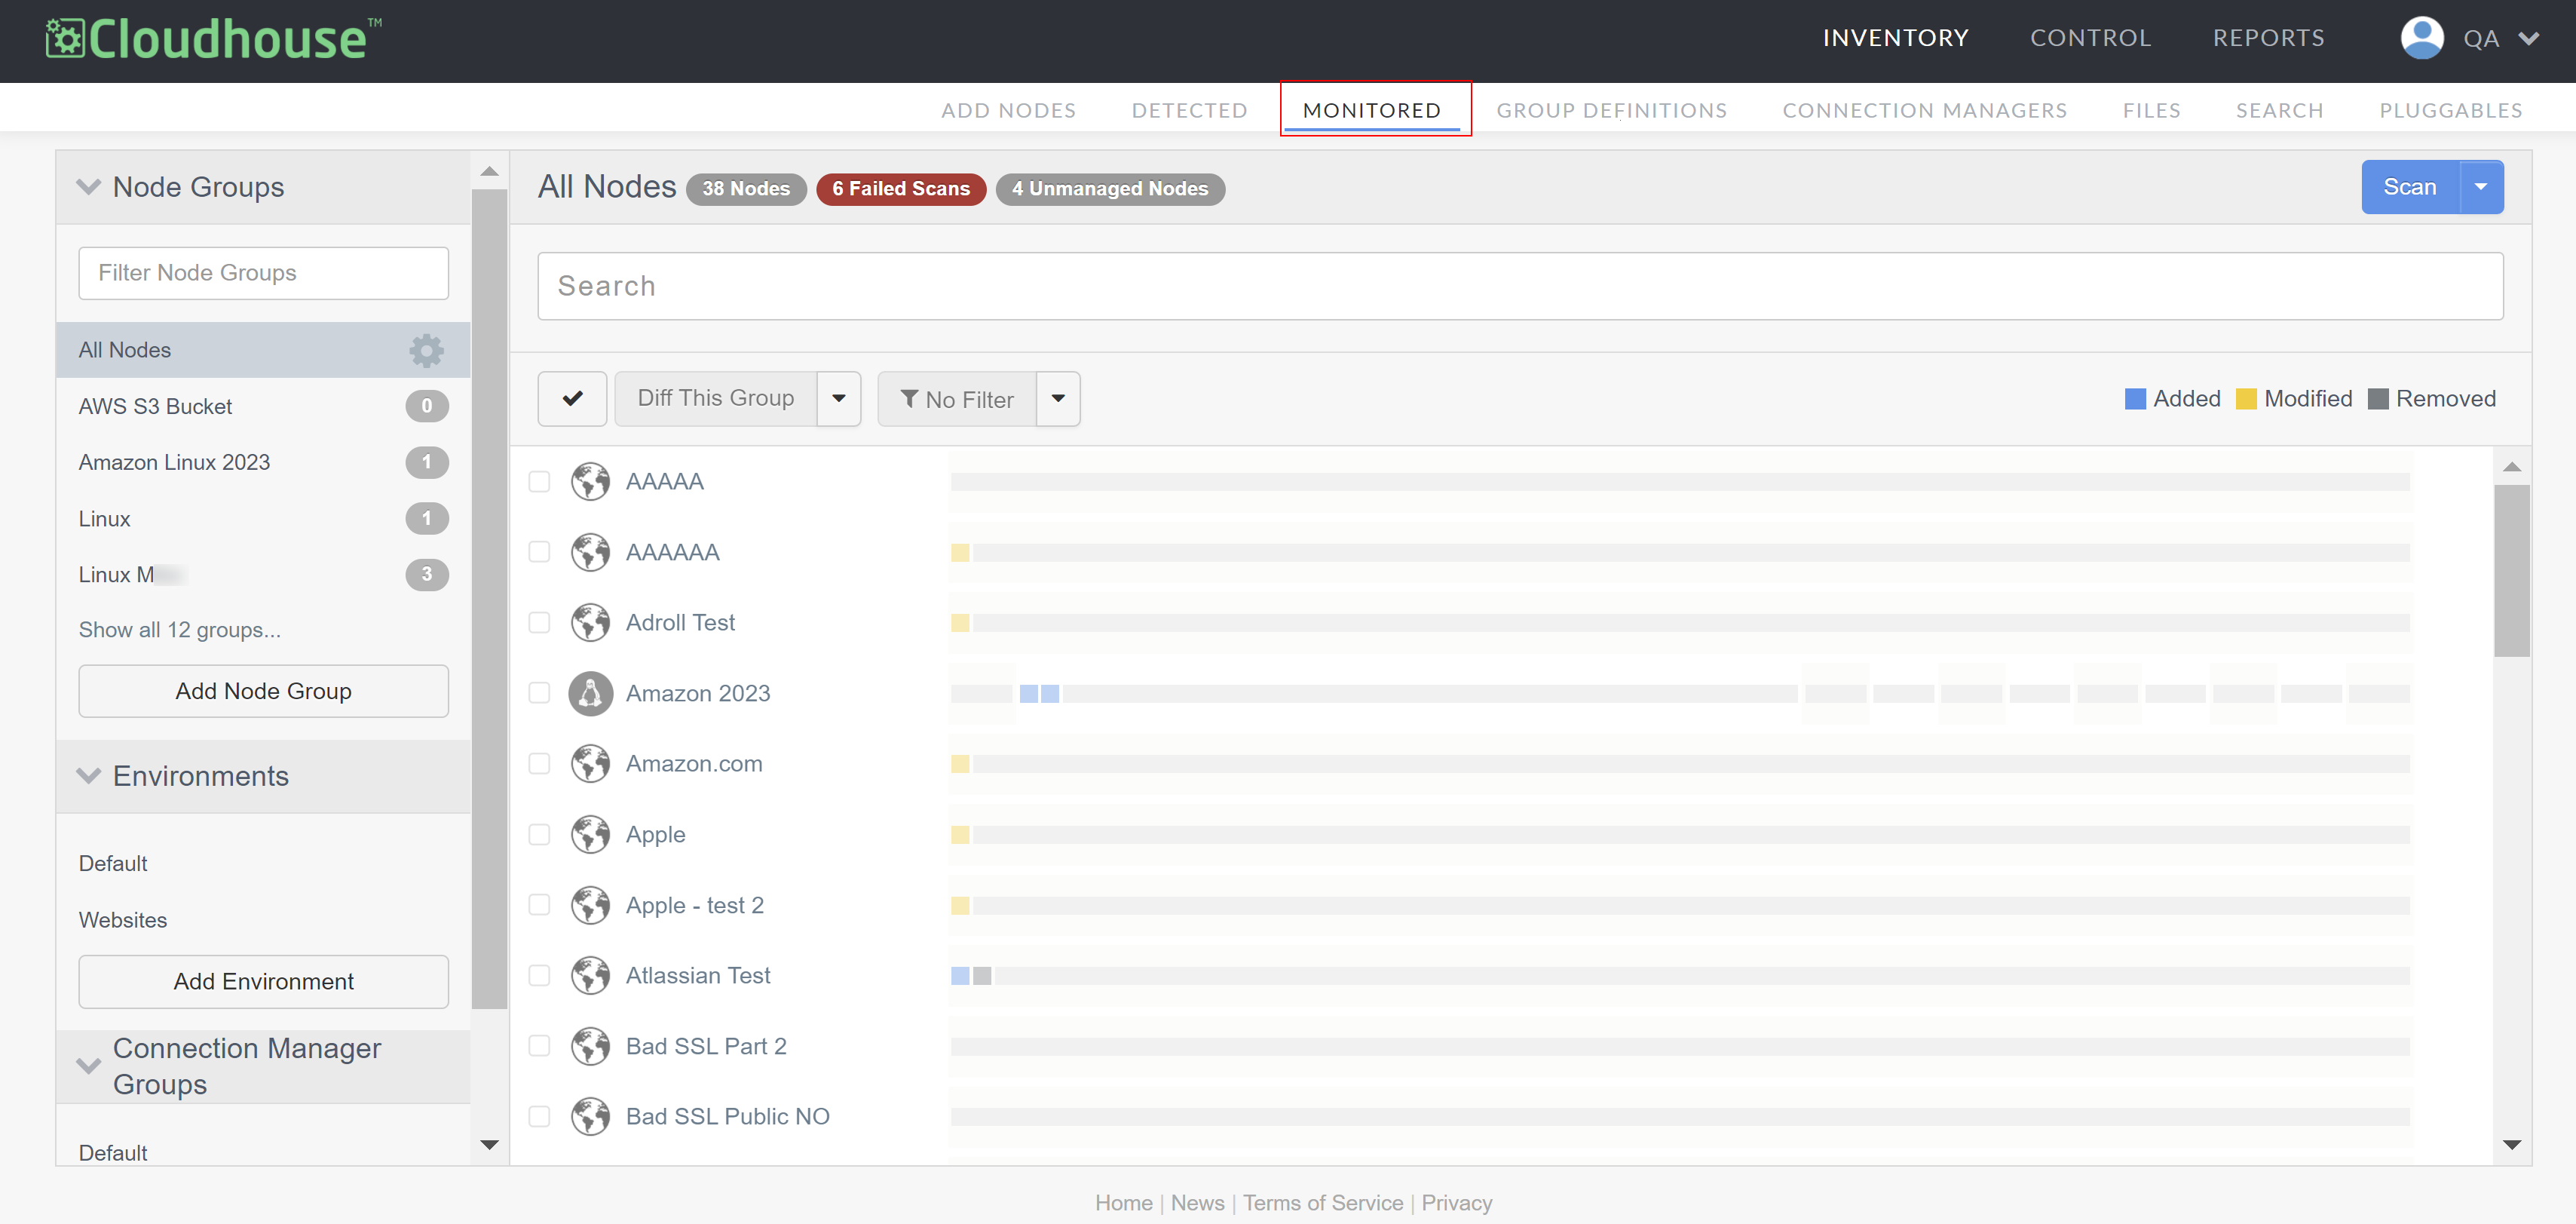
Note: If you want to display the list of monitored nodes contained within a different node group, select a node group from the Node Groups drop-down menu.

-
Select the node you want to edit from the list of monitored nodes. The node scan results page is displayed. For more information, see Node Scan Results.
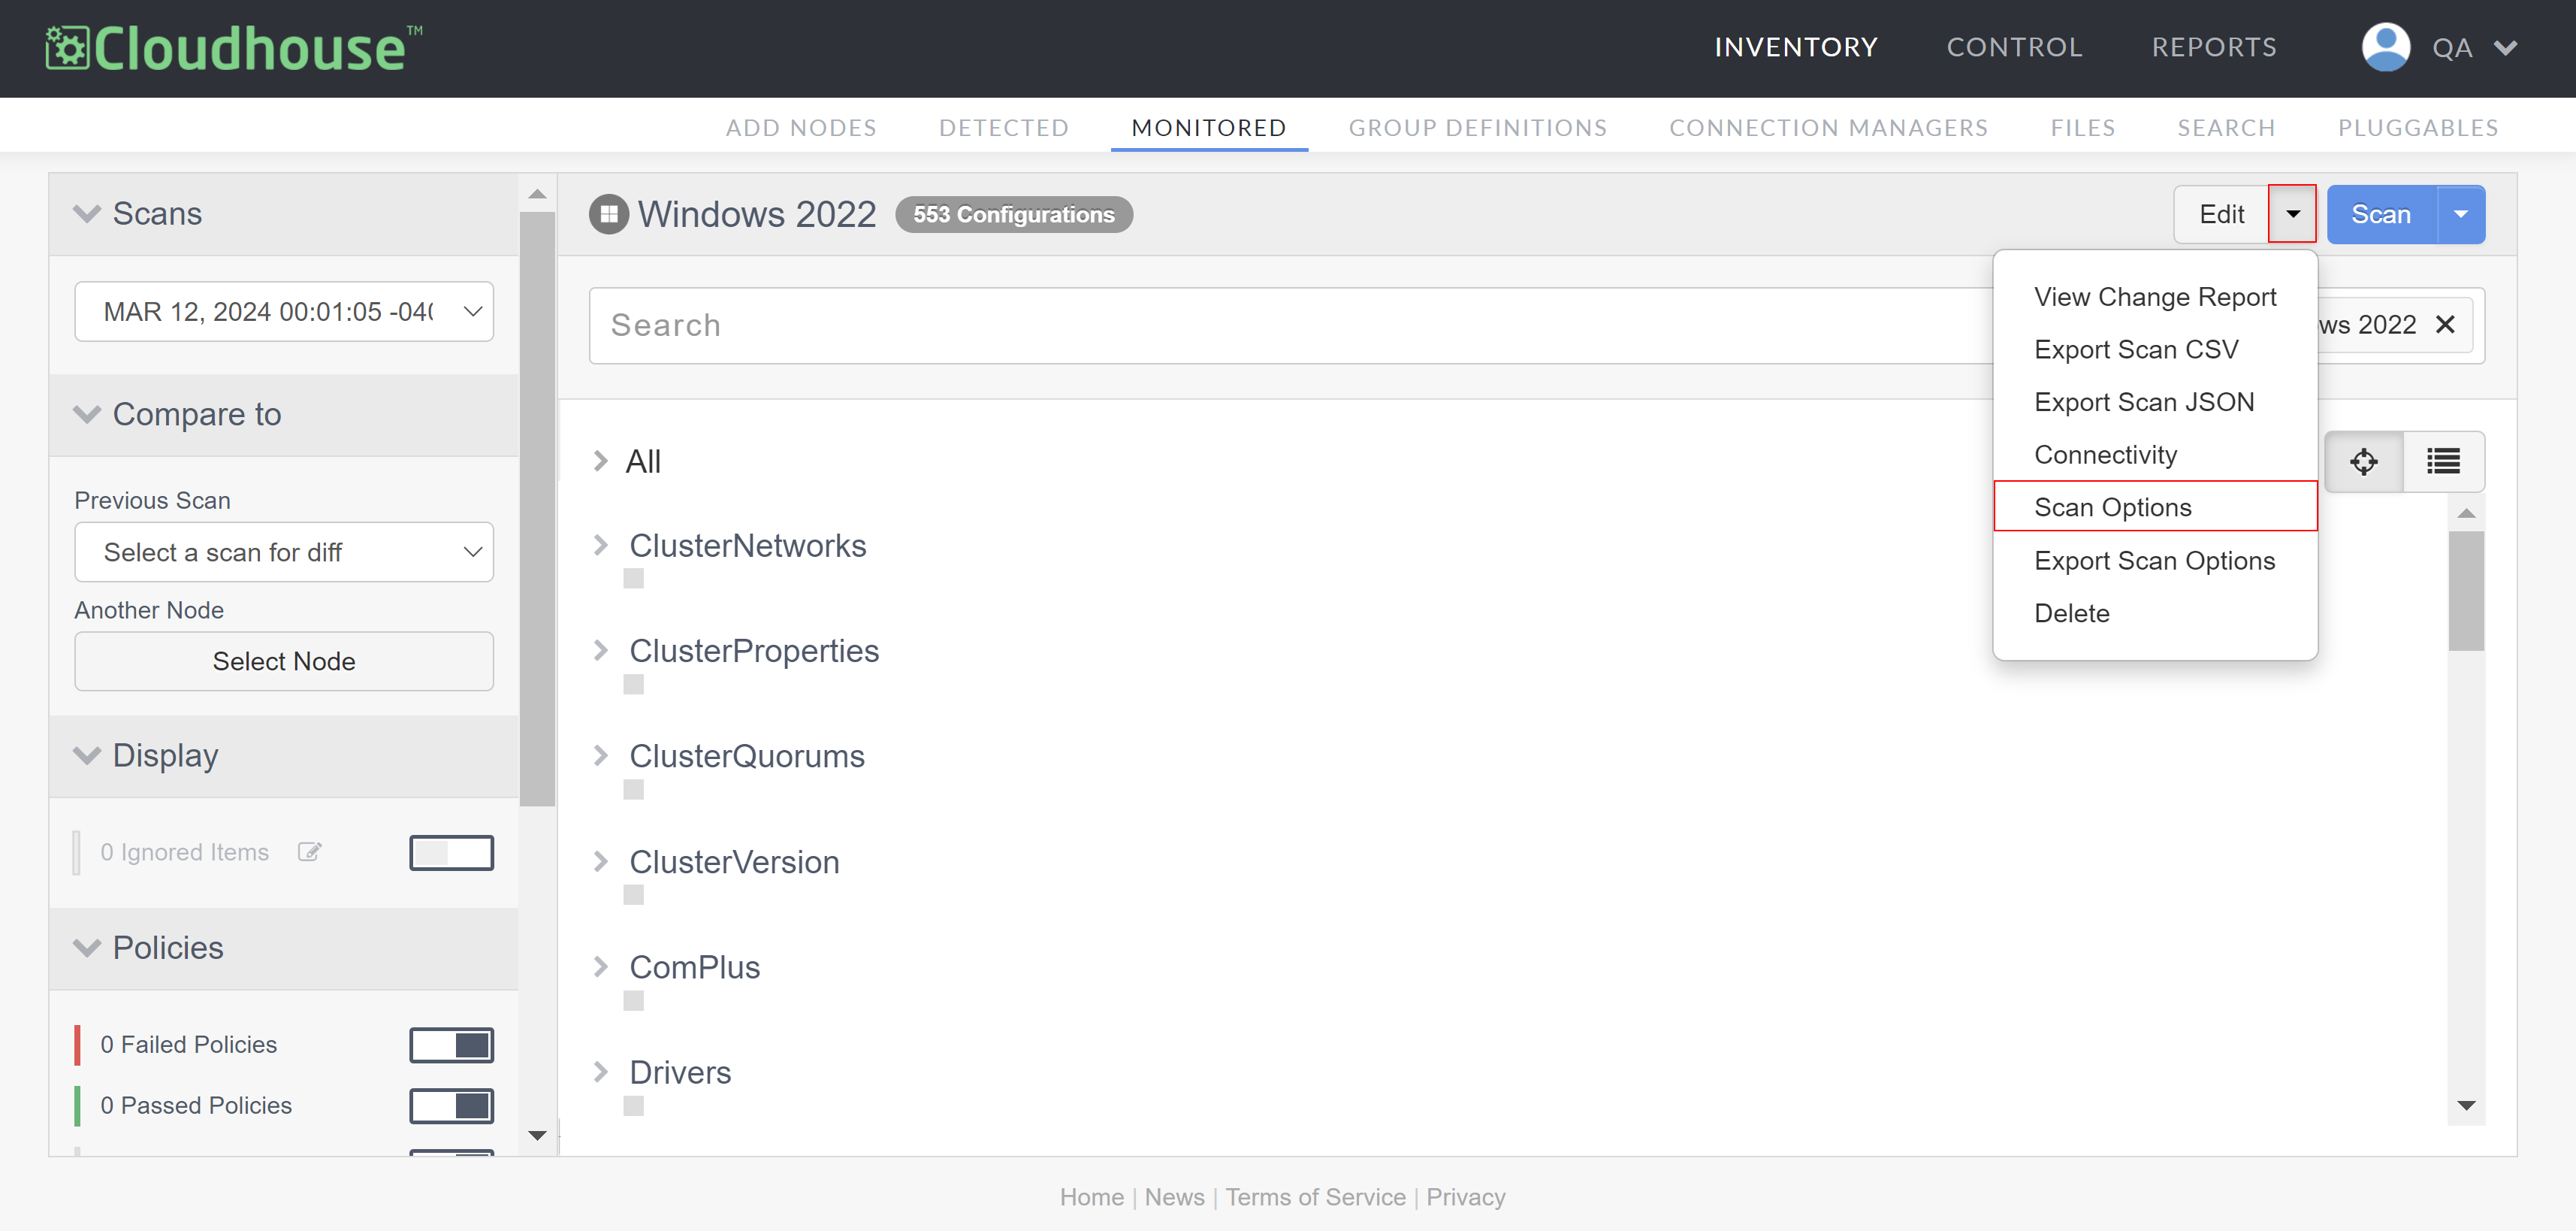
-
Click the Edit drop-down and select Scan Options. The Scan Options page is displayed.
-
Select the node group you want to apply the scan options to from the list of Node Groups.
Warning: By default, the 'All Nodes' node group is displayed. However, scan options on the 'All Nodes' node group are not available to edit. Select a different node group to edit the corresponding scan options.
-
Then, add or edit the scan categories in the Categories section. For more information on the information contained within each category, see Categories.
Once you edit an item from the Categories section, the scan options are saved and applied to the selected node group the next time the nodes are scanned.
Note: If you choose not to edit your scan options, the settings you first selected when adding a node group are still valid. For more information, see Add Node Group.
Syntax Rules
When customizing a node group's file scan options, you can use different syntax rules to define which file(s) or folder(s) you want to be scanned, see below for more information.
Absolute Path
The absolute path refers to a file or directory location described from the root of the file system hierarchy. You can use the absolute path syntax to define a specific file or all files within a folder to be scanned. For example:
-
To scan the Guardian Agent binary, use:
C:\Program Files\Guardian\bin\upguard.exe. -
To include all files in the
C:\Windows\System32folder, use:C:\Windows\System32.
Wildcard Syntax *
The wildcard syntax, represented by '*', is used to match any sequence of characters in a filename or path, to scan a particular type of file within a given folder. For example:
-
To include all files with the same extension in a folder, for example, an .exe extension, use:
C:\Windows\System32\*.exe. -
To include all files, regardless of the file extension, use:
C:\Windows\System32\*.
Note: The example above will only search for .exe files in the C:\Windows\System32 folder and will not look in any subfolders. To search in subfolders, see Greedy-star Syntax below.
Greedy-star Syntax **
The greedy-star syntax, represented by '**', is used to search through files, folders and subfolders recursively. That means you can use a filename or path that will not only try to match files in the directory, but its nested directories within it. For example:
-
To include all .exe files in
C:\Windows\System32and all its subfolders, use:C:\Windows\System32\**\*.exe. -
To include all files, regardless of the file extension in
C:\Windows\System32and all of its subdirectories, use:C:\Windows\System32\**\*.
Warning: File scanning is capped at a 1500 file count limit. Consider refining your scan options to include only configuration item extensions such as .config, .xml or .ini.
File Exclusion via Path Negation
To cause files that match the above syntax patterns to not be returned as a part of the scan, you can prepend a file path with '!'. All forms of glob syntax for the excluded option will still be supported with file path negation.
For example, if you used !C:\Folder\**\*.log, then C:\Folder\Folder2\sample.log would be excluded from the scan, as would C:\Folder\something-else.log. This is due to the greedy-star syntax that would help match any .log files within that directory and all other subdirectories.
As another example, to include all files within a git repository, but exclude the .git/ directory and all contents of that directory, the following scan option path rules could be set:
| Path | Description |
|---|---|
/home/user/git/project/**/*
|
Scan all files in the project directory, including subdirectories. |
!/home/user/git/project/.git/**/*
|
Exclude all files and directories inside the project’s .git directory. |
!/home/user/git/project/.git
|
Exclude the .git directory itself. |
Order of Precedence of Conflicting Rules
When specifying a number of scan options, particular files can be matched by more than one pattern or path. If your file scan option list does not contain any exclusion rules, then a file matched multiple times will still only be collected once. In essence, the union of all scan rules is returned during a scan.
For a particular node, the scan options may be more complex than first thought if the node is inheriting various rules from multiple node group-level scan options.
Looking at the git folder example in File Exclusion via Path Negation above, you will notice that the first rule matches all files in a git repository. The subsequent rules then disallow some of those matched files from being included, so the exclusion rules take precedence here.
The order of precedence is as follows:
-
Any path with no stars beats any path with one or more stars.
-
Any path with a single star beats any path with a double star.
-
The longer (more specific) path beats a less specific path.
-
Lexicographic order.
These rules generally cater for most use cases where a larger, more general pattern is specified, followed by more specific exclusion rules for subsets of matched files. For more information on other examples, see How File Scan Options are Derived.
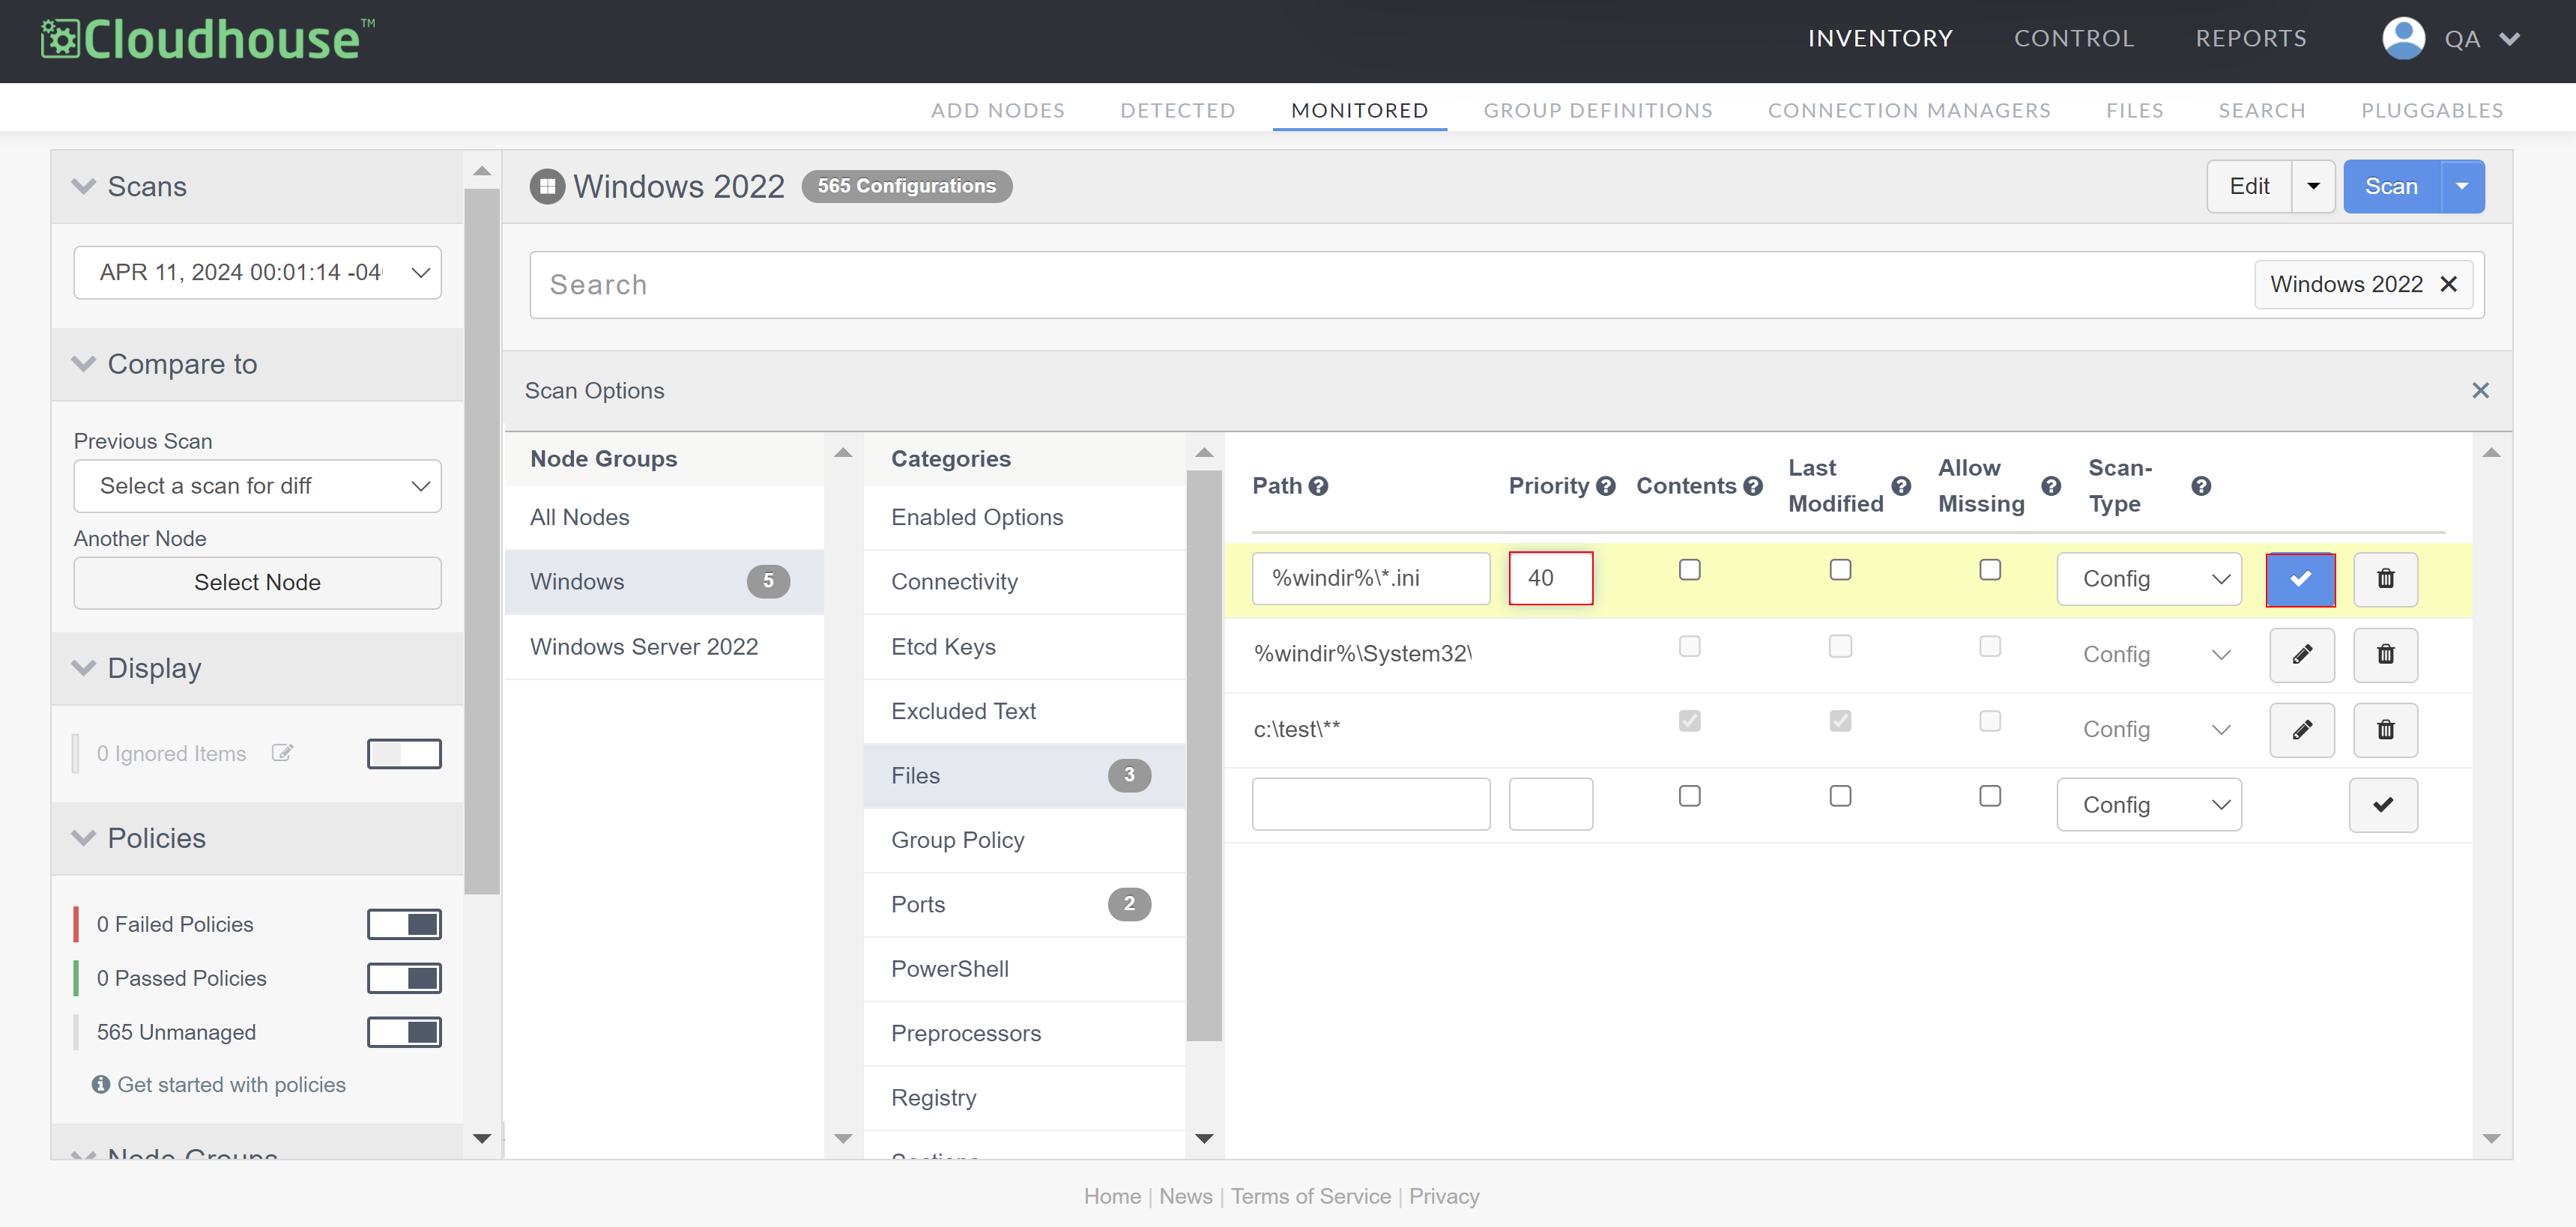
Custom Order of Precedence
If you have a particular use case that does not fit with the default Order of Precedence of Conflicting Rules outlined above, then you can give specific scan path rules a priority. Since scan options are set within node groups and nodes can be assigned to multiple node groups, there is a possibility that a conflict could occur. For example, if the priority is set to '1000' (the lowest priority) in one node group and '1' (the highest priority) in another, the higher priority is used by default. Also, by default, if a scan option does not have a priority value set, then it defaults to the value of '1000'. Lower numbers have higher priority.
To set a custom priority for a file scan option, complete the following:
-
On the Scan Options page, navigate to the Files category and click the Edit button (
 ) next to the file scan option you want to modify. The Priority field is then available to edit.
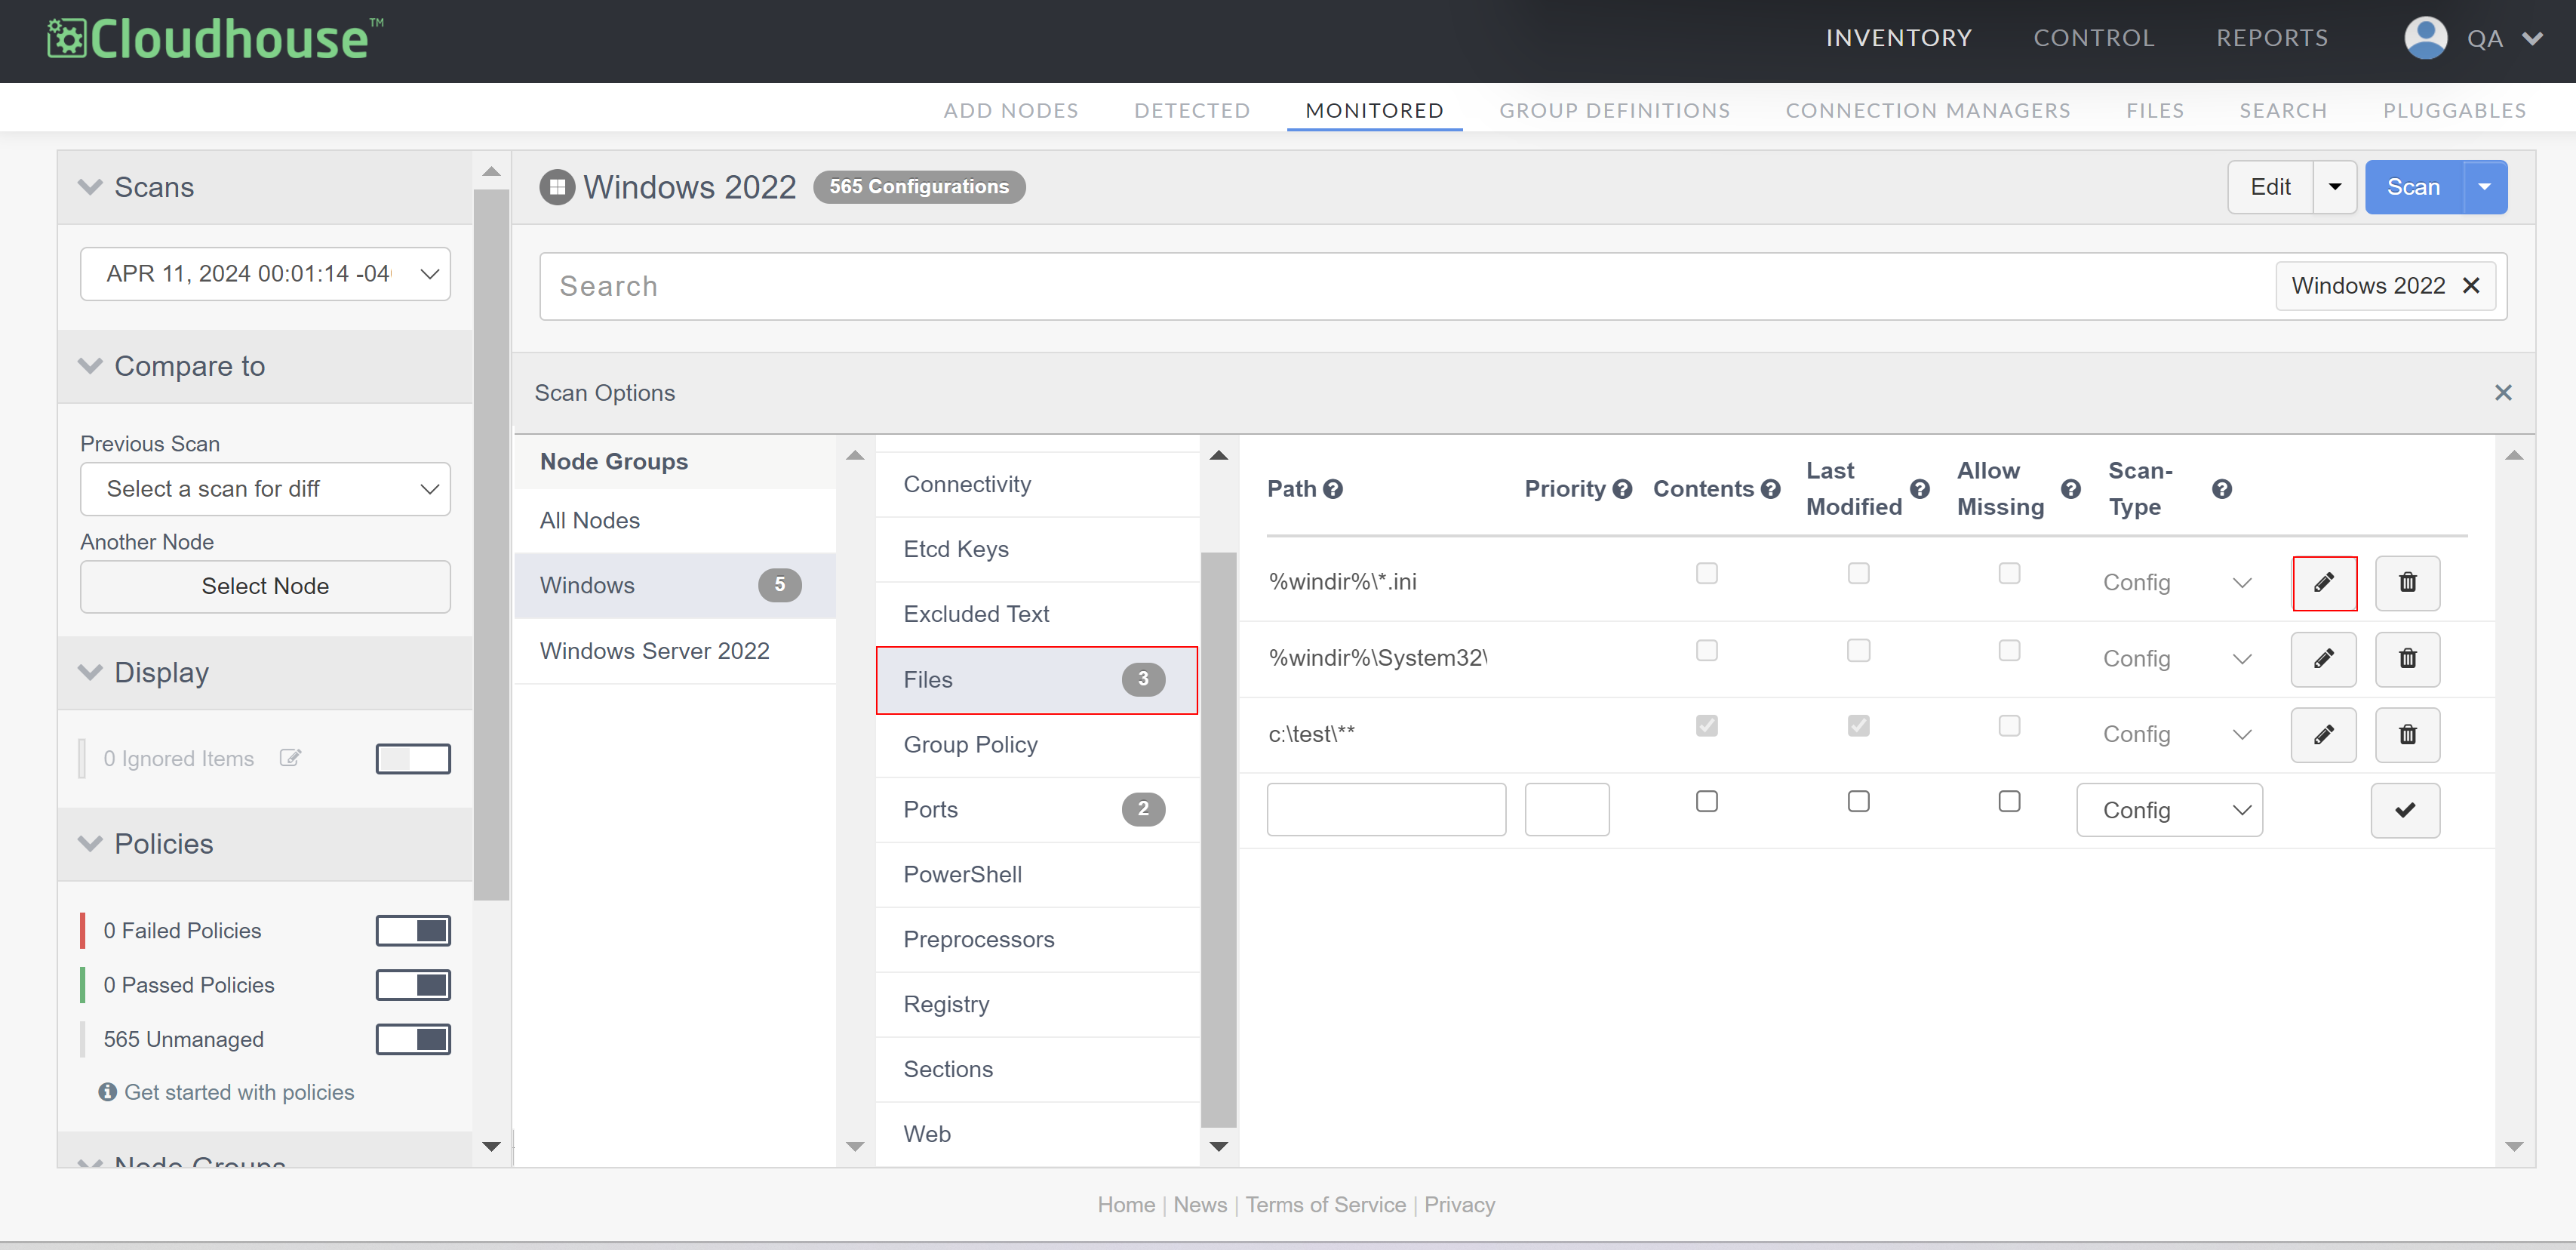
-
Enter the Priority value and click the Check button (
 ) to apply the new value. The file scan option
 %windir%\*.iniin the example below has had the priority value set to '40'.
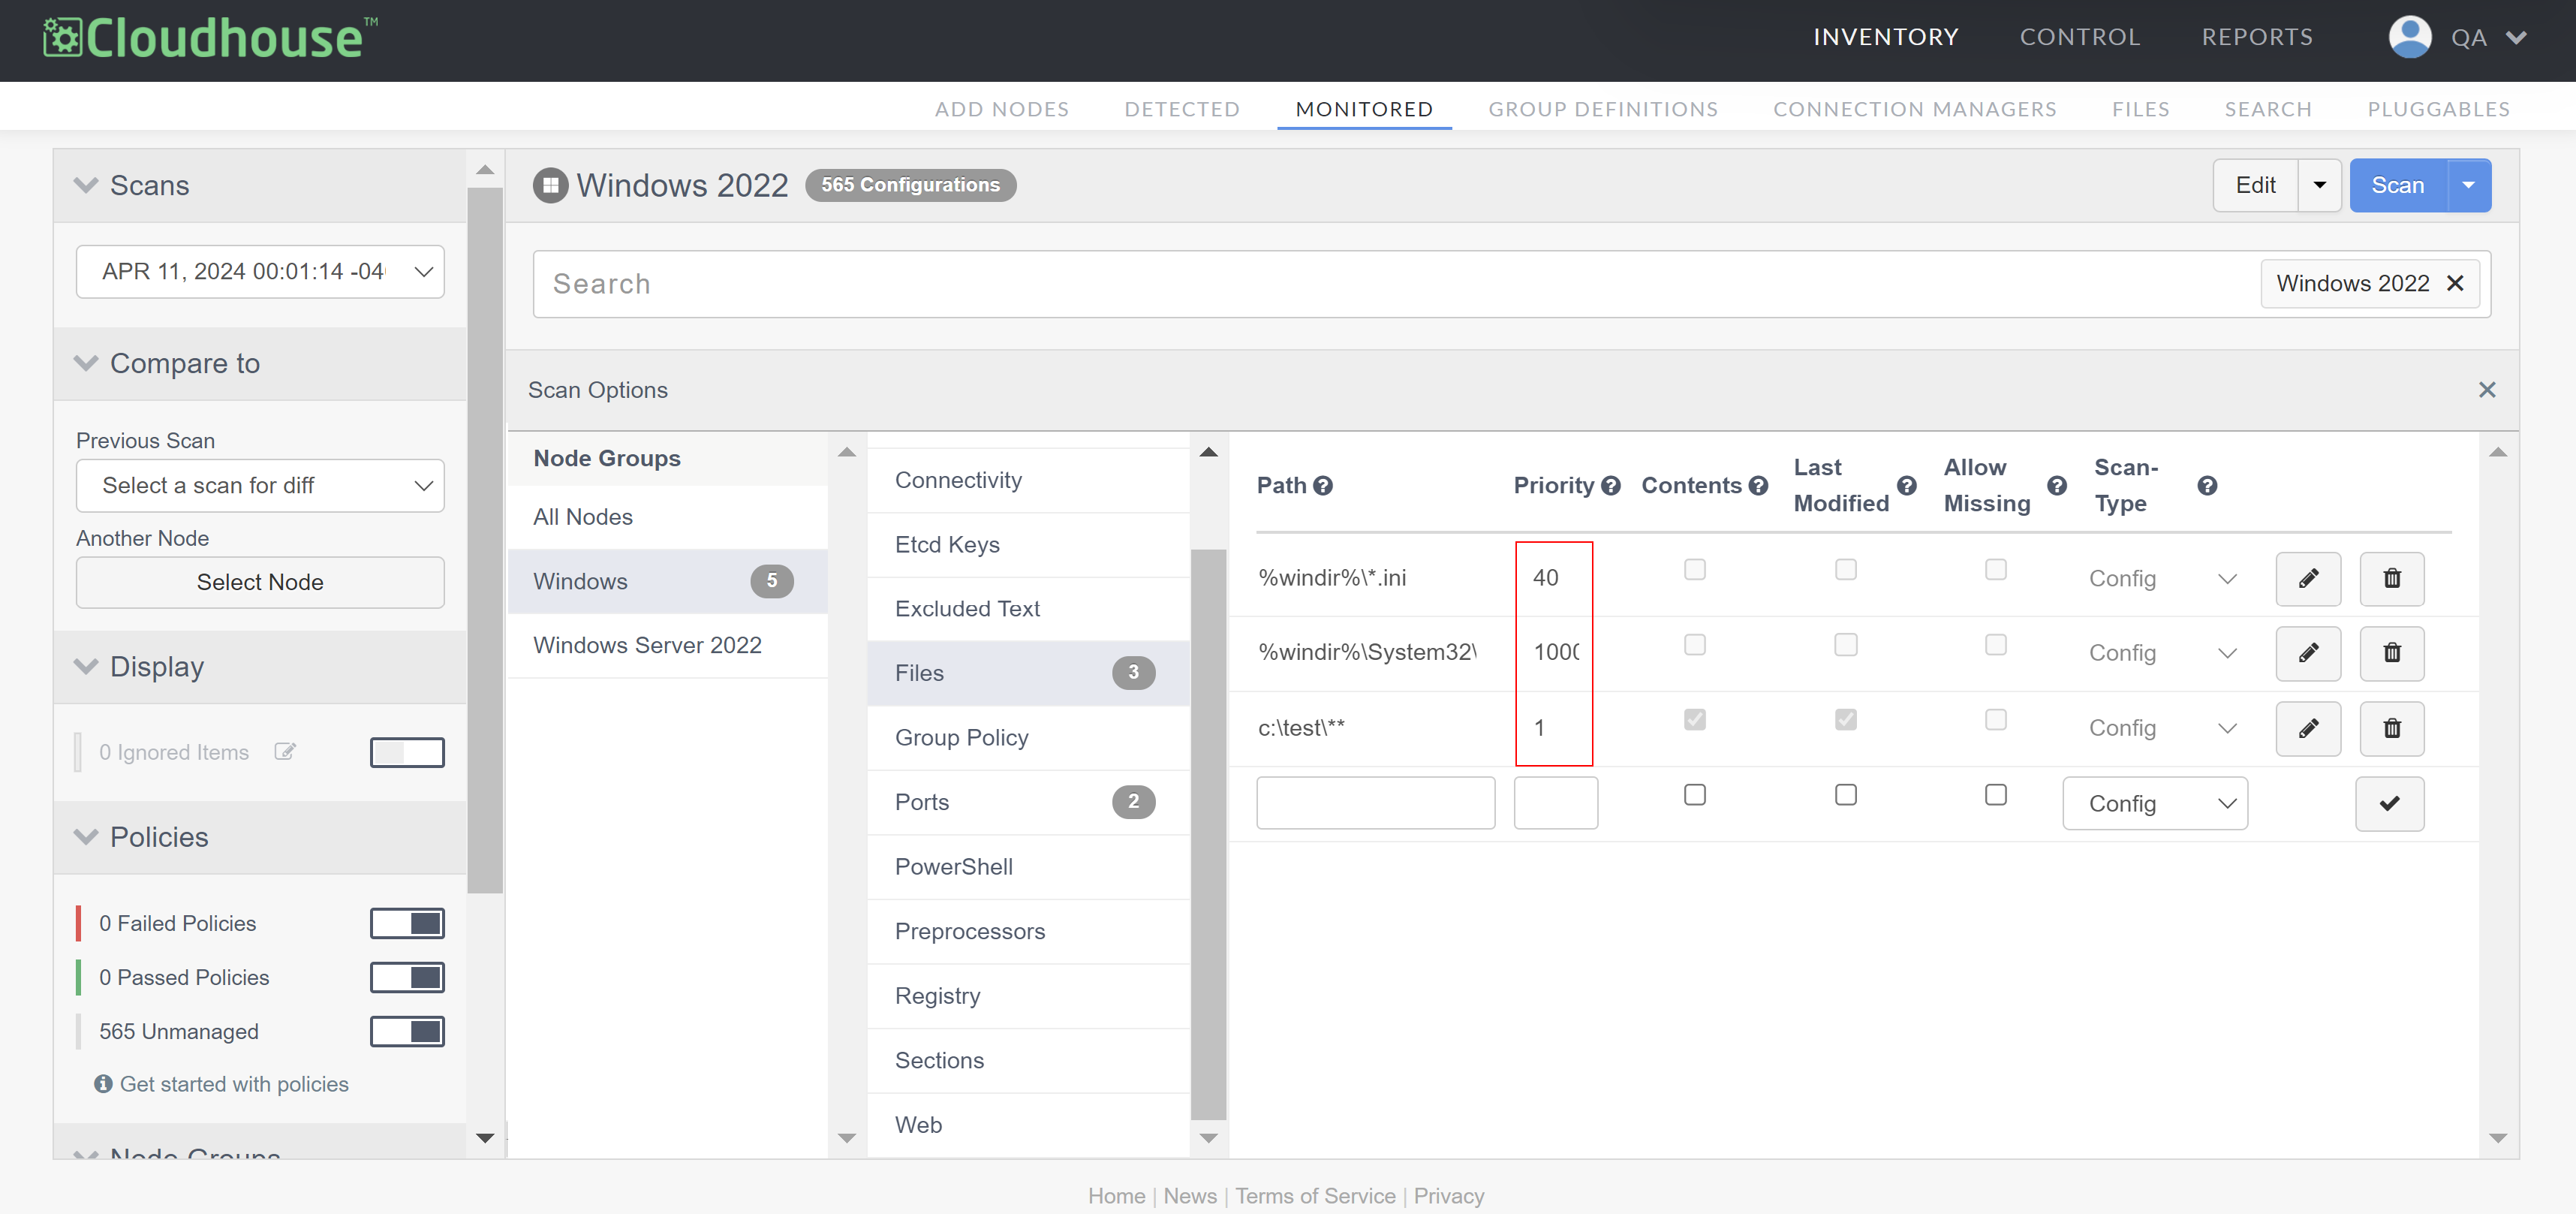
Looking at the example above, if the other two files also have their Priority value set, for example, file %windir%\System32\drivers\etc\* with '1000' (lowest priority) and file c:\test\** with '1' (highest priority), the order of precedence of the files would be:
-
c:\test\**– Priority value 1. -
%windir%\*.ini– Priority value 40. -
%windir%\System32\drivers\etc\*– Priority value 1000.
Variables
In Guardian, variables are pieces of text that are replaced with data relevant to a specific event. For example, applying the variable {{ node_name }} in the Excluded Text category replaces the variable with the actual ID of the user logging in to Guardian at the time the action is triggered. Similarly, applying {{ node_environment }} replaces the variable with the corresponding node environment name that the node belongs to. Using variables can make your API calls dynamic and ensure relevant information is sent in your request. Variables can be applied at the node or node group level and must use liquid syntax. The following list outlines some of the most commonly used variables:
Note: For more information, see Variables.
{{ node_name }}{{ node_environment }}{{ hostname }}{{ ipaddress }}{{ operatingsystem }}{{ osfamily }}
Troubleshooting
If no files were returned for your scan options, even though they're defined on the node, try the following steps to troubleshoot the issue:
-
List the scan option pattern on the command line of the target node. For Linux nodes, use the
lscommand. For Windows nodes, use thedir /bcommand. -
Confirm that the account responsible for scanning the node has the permissions required to access the files or directory in question.